Download Sample: enpit.sample.adf1213.deck-jdev1213-v2.zip (It contains the use case for Image -> Detail and Slideshow)
Showing posts with label adf. Show all posts
Showing posts with label adf. Show all posts
Sunday, January 25, 2015
ADF 12c Deck component Overview & Programmer examples
This year the german ADF Community resumed with "ADF Spotlight" - a series of 30 min Webcasts. It was my turn to give use cases and a programmers overview for the ADF 12c deck component. Since I like to share with the international community I made an english version of the few slides.
Download Sample: enpit.sample.adf1213.deck-jdev1213-v2.zip (It contains the use case for Image -> Detail and Slideshow)
Download Sample: enpit.sample.adf1213.deck-jdev1213-v2.zip (It contains the use case for Image -> Detail and Slideshow)

Wednesday, September 3, 2014
Annotation Driven Bean and EJB DataControls in ADF 12c
So as the trend of using annotations over XML configurations goes on and on in software development there is no exception to ADF. Many developers asked for more annotations to configure metadata on Bean DataControls. Since ADF 12c finally there is support for annotations on Bean and EJB DataControls. Let's have a look on it.
Sample POJO DataModel
In my sample I am using a simple Data Model that I want to expose as Bean DataControl to check the new annotation features. We use simple POJOs „Person and a PersonService". See next figure

Next we want to see some of the annotation features in action.
Primary Key Definition
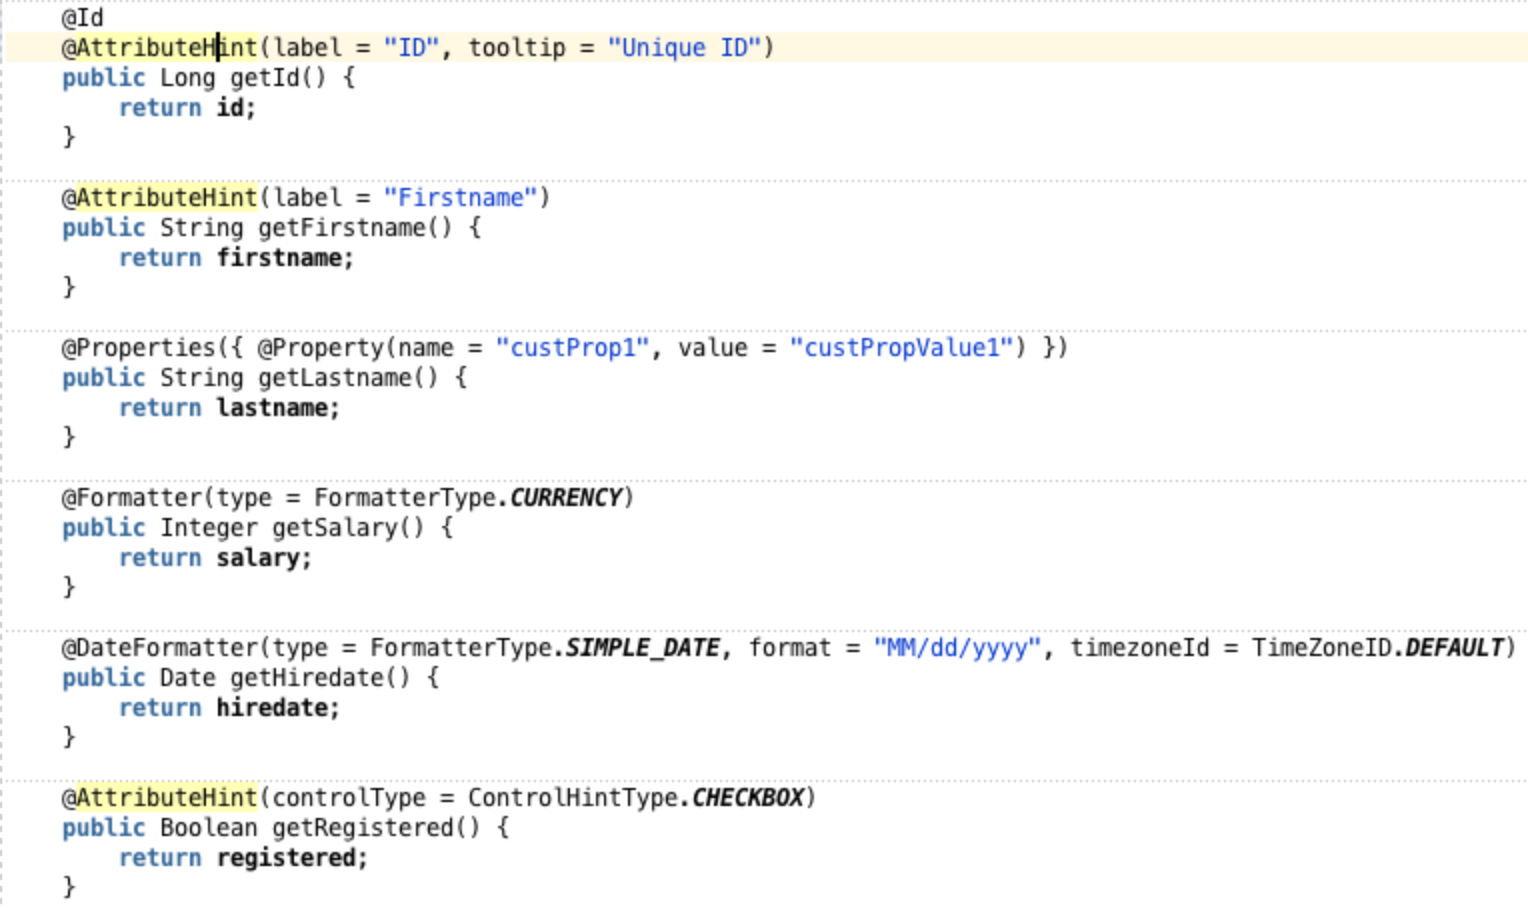
In order to make your DataModel functioning correctly in most cases you should define a primary key. You can do this now with the @Id-Annotation: (No need to generate an XML file for these kind of metadata)

(If using JPA-based entity classes make sure to use the javax.persistence.Id annotation)
Setting UI Hints
To set specific UI Hints like label, tooltip, display, width, height, autoSubmit, controlType, formatType, format, timezoneId, etc. you can leverage the @AttributeHint, @DateFormatter and @Formatter Annotations. Further it is possible to define custom properties through @Property annotations
See the whole feature list for UI Hints here: http://docs.oracle.com/middleware/1213/adf/develop-data-controls/data-controls-ejb.htm#ADFDC996
Note a: If you set UI hints for an attribute both using annotations and in an XML data control structure file, the settings in the data control structure file take precedence.
Note b: When you apply annotations for UI hints, you can not see the affect of the hints in the design-time view of pages that you create based on the data controls. However, you can test and verify the hints using the ADF Model Tester.
BTW: Everything looks easy so far, but: The most challenging part for me was to recognize that these annotations only work on METHOD level and not on FIELD level although there are no compile errors! It felt natural for me to put these annotations on fields, but believe me, it won't have any effect in ADF 12.1.3. So remember

Interesting to note: The @Id Annotation works also on FIELD level!
Testing the result
Running the sample we see that the annotation driven meta data is recognized correctly. It has been applied to Table Column Headers and Form Labels, Formatters and Input-Types.

Setting AccessMode for Collections
For collections you can define the AccessMode (Scroll, Range-Paging or None).

For SCROLLABLE or RANGE_PAGING Mode to work correctly you need to implement the following method signatures (for every collection)
List<Person> getPersons(int firstResult, int maxResults)
long getPersonsSize()
Note: These annotations only work on getter methods.
Testing Metadata Using the Oracle ADF Model Tester
For EJB and Bean Data Controls you can go to the DataControls.dcx file select the given DataControl and exceute „Run" from the context menu.

=> This is pretty cool. As your deployment roundtrips can be reduced ;)
Gotchas
First everything looks promising. But if you try to do some real world developer roundtrips some gotchas appear. Commenting some annotation out, testing changes etc you notice that some information are not refreshing properly inside JDeveloper. So, e.g.
Step 1: Change primary key definition

Step 2: Open DataControls.dcx

=> The change is recognized correctly by the DataControls Editor.
Step 3: Go to the structure definition file (Person.xml)

=> The old attribute is still displayed as primary key! Expected: firstname, because of the recent changes. Hhhm. Is this a bug? It could lead to frustration and unexpected behaviour. Workaround is to close the JDeveloper application and open it again. Looks like a caching/synchronization failure.
Conclusion
The support for annotations is getting better in ADF. Besides some caching problems at design time views there is missing support for Validation. As JSR 303 (Bean Validation) is Java industry standard and widely adopted it would be cool to see ADF moving in that direction too! At this time Validations on POJO DataModel must be done in the DataControl structure files per entity. Due to the "sparse bean nature" the XML file only for the given entities needs to be generated.
Download
Sample application build with JDeveloper 12.1.3: enpit.sample.dc.annotations-jdev1213.zip
Further information
Saturday, June 7, 2014
Create RESTful services on top of ADF Business Components
Introduction
Creating SOAP Services on top of ADF Model is for a long time quite easy and convenient. In JDeveloper: Open an ApplicationModule goto WebService Tab and create a Service Interface by exposing some given ViewObject Instances or custom Service methods. See http://www.oracle.com/technetwork/issue-archive/2012/12-sep/o52adf-1735897.html (Consume Early, Consume Often) for more details and great explanation or take a look in the official Oracle documentation http://docs.oracle.com/cd/E23943_01/web.1111/b31974/bcextservices.htm#CJAJGIEB (11 Integrating Service-Enabled Application Modules)
Options to create RESTful Services on top ob ADF BC Model
Creating a RESTful Service Fassade on top of existing ADF Business Components Model is not that straightforward. From different „announcements" we know that Oracle plans to generate RESTful Services ADF BC SDO (Service Data Object) in the future. But for now we need a custom solution.
Exploring various possibilities I came up with the following

Note that the Service Facade is optional but recommended in terms of „separation of concerns", „service virtualization", „clean code", etc. Watch the youtube ADF Insider Essentials for the detailed explanation of the Service Facade Pattern.
Going from top to bottom in the diagram we have the following options
a) ADF BC -> SDO Service Interface -> WebService -> SOAP
b) ADF BC -> SDO Service Interface -> Inject EJB in REST-Resource -> REST
c) ADF BC -> Use AM Instance programmatically in REST-Resource ->REST
d) this one is planned for some 12.1.3+ release (and in future will be the default option to expose RESTful Services for a given ADF BC Model).
In this post I am covering case b. I did not find a sample on the web yet. So I give it a try cause it looks like THE pragmatic approach so far.
Howto
For the example I am using JDeveloper 12.1.2 and the corresponding Runtim ADF 12.1.2. In order to understand the next steps I assume you know the basics of ADF and JDeveloper.
1. Create ADF BC SDO SOAP Service for an Application Module:
Open the AM in „Overview", goto "Web Service" Tab. Now open the dialog to create the service interface.

Choose the desired VO-Instances and apply you changes.
JDeveloper should generate some files now. If you take a look in the *ServiceImpl.java Class you will notice that it is exposed as Stateless Session EJB. This is great!

Because from now on you can use the EJB in a REST-Resource to expose it as RESTful-Service. That's what we are planning to do next.
But before this step test your generated (SOAP-based) service first: Make sure you do not ran into the „StackOverflowException" because the SDO Service will try to traverse the ViewLinks recursively. So the following exception might be the one you will run into.

To fix this, open the corresponding ViewLink and uncheck the property „Generate Property in SDO"

2. Next: Create a new Project for the RESTful Service
Use the right project template from the NEW-Wizard

Open the NEW-Wizard again and create a RESTful service from new

Deselect the Checkbox in front of GET-Method. We are going to do that later in Sourcecode.

Finish. => This should generate a Java class and configure the project with the Jersey Library.
For the sample to complete the project needs on more adjustment in the project properties.
- One more Library (Context and Dependency Injection CDI)

and a dependency to the Model-Project because the RESTfulWebService project need access to the application module.

Thats all for the project setup.
3. Add some classes, annotations and the methods you want to expose
import javax.ejb.EJB;
import javax.inject.Singleton;
import javax.ws.rs.GET;
import javax.ws.rs.Path;
import javax.ws.rs.PathParam;
import javax.ws.rs.Produces;
import oracle.jbo.service.errors.ServiceException;
@Singleton
@Path("api")
public class HrRESTResource {
@EJB
HRAppModuleService serviceBean;
public HrRESTResource() {
}
/**
* getEmployeesView1: generated method. Do not modify.
*/
@GET
@Path("emp/{empId}")
@Produces(value = { "application/json", "application/xml" })
public EmpResult getEmployeesView1(@PathParam("empId") Integer employeeId) throws ServiceException {
EmployeesViewSDO empSDO = serviceBean.getEmployeesView1(employeeId);
EmpResult result = new EmpResult();
result.setEmployee(empSDO);
return result;
}
@GET
@Path("depts")
@Produces(value = { "application/json", "application/xml" })
public DeptResult findAllDepartments() throws ServiceException {
DeptResult result = new DeptResult();
result.setDepartmentList(serviceBean.findDepartmentsView1(null, null));
return result;
}
}
Important note: For what ever reason you need to annotate the REST-Resource with @javax.inject.Singleton. Otherwise the EJB-Injection won't work.
Just reuse the SDO-Entity-classes (eg. EmployeesViewSDO), but wrap them inside a custom „Result"-class which should be annotated with @XmlRootElement (JAX-B Standard).
@XmlRootElement
public class DeptResult {
public DeptResult() {
super();
}
@XmlElement(name="departments")
private List<DepartmentsViewSDO> departmentList;
public void setDepartmentList(List<DepartmentsViewSDO> departmentList) {
this.departmentList = departmentList;
}
public List<DepartmentsViewSDO> getDepartmentList() {
return departmentList;
}
}
See attached sample application for the whole source code.
4. Run an see the RESTful service in action
As a result we will get the proper JSON structure

if changing the accept- Header to: application/xml we will get XML-Result.

This is pretty cool. Because we can reuse the generated ADF BC SDO SOAP Service Layer as EJB for the REST Fassade.
Download sample application, based on Version ADF 12.1.2: enpit.sample.adf12.restadfbc-jdev1212.zip
More Information
- (Integrating Service-Enabled Application Module, 11.1.2.4) http://docs.oracle.com/cd/E37975_01/web.111240/e16182/bcextservices.htm#CJAJGIEB
- Consume Early, Consume Often (Oracle Magazin, by Frank Nimphius)
Monday, February 17, 2014
ADF Faces: How to skin a great looking breadcrumb
Although the default ADF Skin is fine for many UI requirements, there are often special customer needs for specific design. In this short blogpost I am going to show how you can skin a great looking breadcrumb (with plain CSS). The following picture shows what I am talking about:
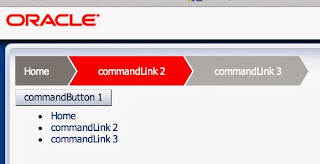
Usage
Inside ADF Pages it should be is easy to create such a breadcrumb:
<af:commandLink text="Home" id="cl1" />
<af:commandLink text="commandLink 2" id="cl2"/>
<af:commandLink text="commandLink 3" id="cl3"/>
</af:panelList>
Environment
Created with ADF 11.1.2.4 (but should also work with 11gR1 oder 12c)
Tested with current versions of
- Safari
- Chrome
- Firefox
- IE 9
How to do it
Create a custom ADF Skin with the following CSS Statements
af|panelList.MyBreadcrumb ul {
list-style: none;
overflow: hidden;
display: block;
padding-left: 0px;
}
af|panelList.MyBreadcrumb li {
float: left;
/*display: list-item;
text-align: -webkit-match-parent;*/
}
af|panelList.MyBreadcrumb li:first-child a {
padding-left: 10px;
background: gray;
}
af|panelList.MyBreadcrumb li:first-child a:after {
border-left-color: gray;
}
af|panelList.MyBreadcrumb li a:hover:after {
border-left-color: red;
}
/*af|panelList li:nth-child(2) a {
}*/
af|panelList.MyBreadcrumb li a span {
color: white;
}
af|panelList.MyBreadcrumb li af|commandImageLink {
color: white;
text-decoration: none;
padding: 4px 0 5px 55px;
background: #eee;
position: relative;
display: block;
float: left;
}
af|panelList.MyBreadcrumb li af|commandImageLink:text-only,
af|panelList.MyBreadcrumb li a {
color: white;
text-decoration: none;
padding: 10px 0 10px 55px;
background: #bbb;
position: relative;
display: block;
float: left;
}
af|panelList.MyBreadcrumb li a:hover {
background: red;
text-decoration: none;
}
af|panelList.MyBreadcrumb li a:before {
content: " ";
display: block;
width: 0;
height: 0;
border-top: 50px solid transparent;
border-bottom: 50px solid transparent;
border-left: 30px solid white;
position: absolute;
top: 50%;
margin-top: -50px;
margin-left: 2px;
left: 100%;
z-index: 1;
}
af|panelList.MyBreadcrumb li a:after {
content: " ";
display: block;
width: 0;
height: 0;
border-top: 50px solid transparent;
border-bottom: 50px solid transparent;
border-left: 30px solid #bbb;
position: absolute;
top: 50%;
margin-top: -50px;
left: 100%;
z-index: 2;
}
Hint
I know that the usage of direct HTML Selectors in ADF Skin files is not a good practice because the skin could break if upgrading to a new ADF Version. If you like feel free to improve the CSS.
Download
References
Friday, February 14, 2014
ADF: Handling exceptions from BackingBeans inside bounded Taskflow explained
Scenario 1
Exception is thrown in actionListener Code for a commandButton inside a View of a bounded taskflow based on page fragments.
In our example Test1ViewBean is in Request-Scope and contains an ActionListener method that throws a NullPointerException for demo purposes.

This ActionListener is called from a command button
This ActionListener is called from a command button

The Default behaviour in this scenario is the following:

Of course this is not user friendly (+ may cause side effects) so we should use one of the provided ADF Exception handling mechanisms to fix that.
Solution to scenario 1:
Make a guess: (a) DCErrorHandler (b) BTF-Exception-Handler (c) UTF-Exception-Handler (d) Faces-ExceptionHandler (e) Servlet-Exception Handler
Tam da da dam: Solution is "(c) UTF-Exception-Handler" not "(b) BTF-Exception-Handler" as some of you might expect.
Let's see how it works. Create a Method-Activity in adfc-config.xml
and mark it as Exception-Handler.

The Method Activity points - by EL - to the following java method:
ControllerContext cc = ControllerContext.getInstance();
Exception ex = cc.getCurrentViewPort().getExceptionData();
String message = ex.getMessage();
FacesContext fc = FacesContext.getCurrentInstance();
FacesMessage facesMessage =
new FacesMessage(FacesMessage.SEVERITY_ERROR, "UTF: " + message, null);
fc.addMessage(null, facesMessage);
cc.getCurrentRootViewPort().clearException();
fc.renderResponse();
}
Having this Exception-Handler active on runtime the Exception is catched an displayed in a user friendly inline popup

Why the "(b) BTF-Exception-Handler" is not working in the given scenario?
Well, it is because the action event is handled in the standard JSF Lifecycle (invoke application phase) and not inside the ADF Controller of the bounded taskflow.
Download
In the sample application - based on ADF 11.1.1.7 - you can test the different cases and see how everything works in each scenario. enpit.sample.adf.testExceptionHandling-jdev11117.zip

Further Reading
- Oracle ADF: Catch me if you can http://www.oracle.com/technetwork/issue-archive/2013/13-mar/o23adf-1897193.html
- Exception Handler for Method Calls inside ADF Task Flows with Fragments - http://andrejusb.blogspot.de/2011/03/exception-handler-for-method-calls.html
- Task Flow Exception Handler. You must have it. http://adfpractice-fedor.blogspot.de/2011/12/task-flow-exception-handler-you-must.html
Thursday, September 5, 2013
ADF 11gR1: How to improve the UX of tables with filter
In a typical Oracle ADF application there might be a lot of tables with the query-by-example filter functionality. It is a great ADF standard feature that users love. However there is at least one thing that can be improved.
Step 1: The user enters a filter criteria and performs the filtering.

=> The table data is filtered according to the criterion
Step 2: The user clicks on "QBE-Filter" button

=> The filter header row is not visible.
=> The table data is still filtered
=> There is no hint for the user whether the data is filtered and if so how the data is filtered. From UX point of view the UI Feedback is not perfect.
How to improve
To improve the user feedback it would be great to at least have a UI hint if the visible data is filtered or if the "Hide QBE-Filter" button would reset the filter. In this blogpost I am going to show a hack how you can achieve the latter one with ADF 11R1.
Step 1: Create a Javascript file with the following content

To register this override in JavaScript you must register a clientListener for the onLoad event in the JSF page.


Environment
Tested with
ADF 11.1.1.6 normal mode
ADF 11.1.1.7 normal and screenReader mode.
To my surprise this improvement is implemented in ADF 12.1.2! No need to hack if you are on the bleeding edge :)
Disclaimer
The described feature uses an unsupported ADF JavaScript Hack! So use on your own risk if your users want it and your stuck on 11gR1.
Saturday, August 17, 2013
ADF: Creating a custom train button bar, reflecting the disabled state
Requirement
Environment
JDeveloper/ADF 11.1.1.7
Solution
There is a simple solution I found on http://www.adftips.com/2010/10/adf-ui-how-to-specify-actionlistener.html to create custom buttons for the previous / next functionality.
But there is still one thing missing. The buttons are always enabled. Unfortunataly there is no easy way to set the disabled property right from the given trainModel that is accessible by EL.
To solve this we create a managed bean as follows:
Now it is possible to bind the properties for disabled status
Similiar posts
Friday, August 2, 2013
JDeveloper 12c: Create RESTful Service from Java Class
With JDeveloper 12c finally it is possible to create RESTful Services from a Java Class. The implementation is based on Jersey following the Java EE 6 specification JAX-RS. For testing JDeveloper includes a comprehensive Tooling. In general RESTful services are really popular for mobile applications, e.g. ADF Mobile.
public class PersonService {
private List<Person> persons;
private Person person;
public PersonService() {
super();
this.persons = new ArrayList<Person>();
for (long i = 0; i < 10; i++) {
Person p = new Person();
p.setId(i);
p.setFirstname("Firstname " + i);
p.setLastname("Last " + i);
p.setHiredate(new Date());
this.persons.add(p);
}
this.person = this.persons.get(0);
}
Get started
Create a simple Java Class for your business domain object plus a Service Facade that you want to expose as a RESTful Service.
Make sure to annotate the class with the @XmlRootElement otherwise the REST Service will not work for this domain object.
Next create a simple service facade with some test data, e.g.
package enpit.sample.adf12c.pojorest.model;
import java.util.ArrayList;
import java.util.Date;import java.util.List;
import java.util.Date;import java.util.List;
public class PersonService {
private List<Person> persons;
private Person person;
public PersonService() {
super();
this.persons = new ArrayList<Person>();
for (long i = 0; i < 10; i++) {
Person p = new Person();
p.setId(i);
p.setFirstname("Firstname " + i);
p.setLastname("Last " + i);
p.setHiredate(new Date());
this.persons.add(p);
}
this.person = this.persons.get(0);
}
public List<Person> getPersons(){
return this.persons;
}
return this.persons;
}
public void addPerson(Person person) {
System.out.println("add person " + person);
if(person != null){
getPersons().add(person);
}
} public Person getPerson(){
return person;
}
}


@GET
@Path("/persons")
public List<Person> getPersons(){
return this.persons;
}
@POST
@Path("/person")
public void addPerson(@FormParam("person") Person person) {


System.out.println("add person " + person);
if(person != null){
getPersons().add(person);
}
} public Person getPerson(){
return person;
}
}
So far there is nothing special.
Create RESTful Service with the help of JDeveloper 12c
Now comes the interesting part. Select the PersonService.java in the application navigator and
choose "Create RESTful Service…"

You will get a wizard to specify the RESTful Service interface. Set the desired root path. Choose the desired media types and the Methods you want to expose as REST Service

After finishing the wizard the following happens
- JAX-RS Annotations are generated on the Java Class
package enpit.sample.adf12c.pojorest.model;
import java.util.ArrayList;
import java.util.Date;import java.util.List;import javax.ws.rs.Consumes;
import java.util.Date;import java.util.List;import javax.ws.rs.Consumes;
import javax.ws.rs.FormParam;
import javax.ws.rs.GET;import javax.ws.rs.POST;import javax.ws.rs.Path;import javax.ws.rs.Produces;
@Path("rest")
import javax.ws.rs.GET;import javax.ws.rs.POST;import javax.ws.rs.Path;import javax.ws.rs.Produces;
@Path("rest")
@Produces(value = { "application/json", "application/xml" })
@Consumes(value = { "application/json", "application/xml" })
public class PersonService {
private List<Person> persons;
private Person person;
public PersonService() {
super();
this.persons = new ArrayList<Person>(){
for (long i = 0; i < 10; i++) {
Person p = new Person();
p.setId(i);
p.setFirstname("Firstname " + i);
p.setLastname("Last " + i);
p.setHiredate(new Date());
this.persons.add(p);
}
this.person = this.persons.get(0);
}
public class PersonService {
private List<Person> persons;
private Person person;
public PersonService() {
super();
this.persons = new ArrayList<Person>(){
for (long i = 0; i < 10; i++) {
Person p = new Person();
p.setId(i);
p.setFirstname("Firstname " + i);
p.setLastname("Last " + i);
p.setHiredate(new Date());
this.persons.add(p);
}
this.person = this.persons.get(0);
}
@GET
@Path("/persons")
public List<Person> getPersons(){
return this.persons;
}
@POST
@Path("/person")
public void addPerson(@FormParam("person") Person person) {
System.out.println("add person " + person);
if(person != null){
getPersons().add(person);
}
}
@GET
@Path("/person")
public Person getPerson(){
return person;
}
if(person != null){
getPersons().add(person);
}
}
@GET
@Path("/person")
public Person getPerson(){
return person;
}
}
- web.xml is created. The Jersey Servlet is configured properly.
Testing the RESTful Service in JDeveloper 12c
Jdeveloper is quite powerful. It lets you test the RESTful service right in the IDE.
Right-Click on the PersonService.java class and choose Run.

In background WebLogic Server 12c starts and the RESTFul Service gets deployed.

The WADL is kind of WSDL for RESTful Services. Clicking on the "Target Application WADL" URL brings you to the overview of the provided service operations

You can test each Service Operation right from the IDE. Pressing the "Test" Button brings you to the HTTP Analyzer Screen.

Here you can choose the Method, change HTTP Headers (e.g. what kind of media type you want to accept).
Press "Send Request" to actually test the Service Operation. Make sure to change the view to "HTTP Content" not "WADL Structure" otherwise you want see the pretty formatted output on the right hand side.
Change the Accept-Header to application/json and send the request again. The output automatically will be in JSON format.

The HTTP Analyzer is even so good to parse the POST Parameter to create a good looking form for data entry

Conclusion
Creating and Testing RESTful Services is really simple with JDeveloper 12c.
Subscribe to:
Posts (Atom)