Download Sample: enpit.sample.adf1213.deck-jdev1213-v2.zip (It contains the use case for Image -> Detail and Slideshow)
Showing posts with label oracle jdeveloper. Show all posts
Showing posts with label oracle jdeveloper. Show all posts
Sunday, January 25, 2015
ADF 12c Deck component Overview & Programmer examples
This year the german ADF Community resumed with "ADF Spotlight" - a series of 30 min Webcasts. It was my turn to give use cases and a programmers overview for the ADF 12c deck component. Since I like to share with the international community I made an english version of the few slides.
Download Sample: enpit.sample.adf1213.deck-jdev1213-v2.zip (It contains the use case for Image -> Detail and Slideshow)
Download Sample: enpit.sample.adf1213.deck-jdev1213-v2.zip (It contains the use case for Image -> Detail and Slideshow)

Saturday, June 7, 2014
Create RESTful services on top of ADF Business Components
Introduction
Creating SOAP Services on top of ADF Model is for a long time quite easy and convenient. In JDeveloper: Open an ApplicationModule goto WebService Tab and create a Service Interface by exposing some given ViewObject Instances or custom Service methods. See http://www.oracle.com/technetwork/issue-archive/2012/12-sep/o52adf-1735897.html (Consume Early, Consume Often) for more details and great explanation or take a look in the official Oracle documentation http://docs.oracle.com/cd/E23943_01/web.1111/b31974/bcextservices.htm#CJAJGIEB (11 Integrating Service-Enabled Application Modules)
Options to create RESTful Services on top ob ADF BC Model
Creating a RESTful Service Fassade on top of existing ADF Business Components Model is not that straightforward. From different „announcements" we know that Oracle plans to generate RESTful Services ADF BC SDO (Service Data Object) in the future. But for now we need a custom solution.
Exploring various possibilities I came up with the following

Note that the Service Facade is optional but recommended in terms of „separation of concerns", „service virtualization", „clean code", etc. Watch the youtube ADF Insider Essentials for the detailed explanation of the Service Facade Pattern.
Going from top to bottom in the diagram we have the following options
a) ADF BC -> SDO Service Interface -> WebService -> SOAP
b) ADF BC -> SDO Service Interface -> Inject EJB in REST-Resource -> REST
c) ADF BC -> Use AM Instance programmatically in REST-Resource ->REST
d) this one is planned for some 12.1.3+ release (and in future will be the default option to expose RESTful Services for a given ADF BC Model).
In this post I am covering case b. I did not find a sample on the web yet. So I give it a try cause it looks like THE pragmatic approach so far.
Howto
For the example I am using JDeveloper 12.1.2 and the corresponding Runtim ADF 12.1.2. In order to understand the next steps I assume you know the basics of ADF and JDeveloper.
1. Create ADF BC SDO SOAP Service for an Application Module:
Open the AM in „Overview", goto "Web Service" Tab. Now open the dialog to create the service interface.

Choose the desired VO-Instances and apply you changes.
JDeveloper should generate some files now. If you take a look in the *ServiceImpl.java Class you will notice that it is exposed as Stateless Session EJB. This is great!

Because from now on you can use the EJB in a REST-Resource to expose it as RESTful-Service. That's what we are planning to do next.
But before this step test your generated (SOAP-based) service first: Make sure you do not ran into the „StackOverflowException" because the SDO Service will try to traverse the ViewLinks recursively. So the following exception might be the one you will run into.

To fix this, open the corresponding ViewLink and uncheck the property „Generate Property in SDO"

2. Next: Create a new Project for the RESTful Service
Use the right project template from the NEW-Wizard

Open the NEW-Wizard again and create a RESTful service from new

Deselect the Checkbox in front of GET-Method. We are going to do that later in Sourcecode.

Finish. => This should generate a Java class and configure the project with the Jersey Library.
For the sample to complete the project needs on more adjustment in the project properties.
- One more Library (Context and Dependency Injection CDI)

and a dependency to the Model-Project because the RESTfulWebService project need access to the application module.

Thats all for the project setup.
3. Add some classes, annotations and the methods you want to expose
import javax.ejb.EJB;
import javax.inject.Singleton;
import javax.ws.rs.GET;
import javax.ws.rs.Path;
import javax.ws.rs.PathParam;
import javax.ws.rs.Produces;
import oracle.jbo.service.errors.ServiceException;
@Singleton
@Path("api")
public class HrRESTResource {
@EJB
HRAppModuleService serviceBean;
public HrRESTResource() {
}
/**
* getEmployeesView1: generated method. Do not modify.
*/
@GET
@Path("emp/{empId}")
@Produces(value = { "application/json", "application/xml" })
public EmpResult getEmployeesView1(@PathParam("empId") Integer employeeId) throws ServiceException {
EmployeesViewSDO empSDO = serviceBean.getEmployeesView1(employeeId);
EmpResult result = new EmpResult();
result.setEmployee(empSDO);
return result;
}
@GET
@Path("depts")
@Produces(value = { "application/json", "application/xml" })
public DeptResult findAllDepartments() throws ServiceException {
DeptResult result = new DeptResult();
result.setDepartmentList(serviceBean.findDepartmentsView1(null, null));
return result;
}
}
Important note: For what ever reason you need to annotate the REST-Resource with @javax.inject.Singleton. Otherwise the EJB-Injection won't work.
Just reuse the SDO-Entity-classes (eg. EmployeesViewSDO), but wrap them inside a custom „Result"-class which should be annotated with @XmlRootElement (JAX-B Standard).
@XmlRootElement
public class DeptResult {
public DeptResult() {
super();
}
@XmlElement(name="departments")
private List<DepartmentsViewSDO> departmentList;
public void setDepartmentList(List<DepartmentsViewSDO> departmentList) {
this.departmentList = departmentList;
}
public List<DepartmentsViewSDO> getDepartmentList() {
return departmentList;
}
}
See attached sample application for the whole source code.
4. Run an see the RESTful service in action
As a result we will get the proper JSON structure

if changing the accept- Header to: application/xml we will get XML-Result.

This is pretty cool. Because we can reuse the generated ADF BC SDO SOAP Service Layer as EJB for the REST Fassade.
Download sample application, based on Version ADF 12.1.2: enpit.sample.adf12.restadfbc-jdev1212.zip
More Information
- (Integrating Service-Enabled Application Module, 11.1.2.4) http://docs.oracle.com/cd/E37975_01/web.111240/e16182/bcextservices.htm#CJAJGIEB
- Consume Early, Consume Often (Oracle Magazin, by Frank Nimphius)
Saturday, December 1, 2012
Deploying Database Objects to Oracle Cloud using JDeveloper
As announced in my previous post I am going to show now how to deploy Database Objects from a "local" Database to the Oracle Database Cloud. For that showcase I am using the following environment
Environment
- JDeveloper (JDEVADF_11.1.1.6.0CLOUD_GENERIC_121118.1600.6229)
- Oracle XE Database 11gR2 with HR schema
- Oracle Database Cloud Service
Goal
The primary goal is to deploy the tables HR.DEPARTMENTS and HR.EMPLOYEES into the Cloud Schema. So in a next step it will be possible to build an Apex or an ADF Application associated to these tables in the cloud.
Prepare DB Deployment
In order to use the tools provided in JDeveloper for seamless deployment of DB objects into the Oracle Cloud start JDeveloper and open the Database Navigator (View > Database > Database Navigator)
Now create an IDE DB connection to the desired database. I am using the well known HR schema on an Oracle XE DB. This is really straight forward. Just click "+" and add a Database Connection by providing the appropriate account details. Double Click on the created node connects to the database and explores its contents.
+Deploying+Database+Objects+to+Oracle+Cloud+using+@JDeveloper+Image.2.jpeg)
Next we need to connect to the Oracle Cloud Database Service. That is pretty simple too.

Enter your cloud service details

et voila, the cloud connection is established!
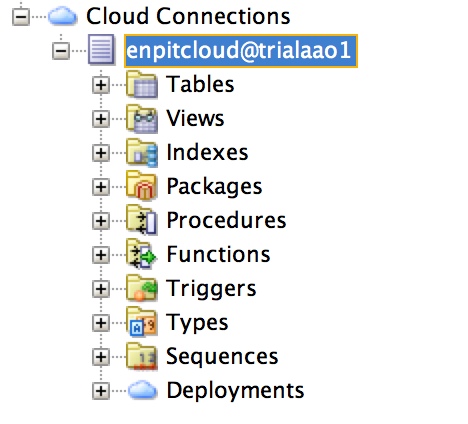
Important note: Before we go further let me explain the cloud connection details because this is really new and should be noted. The cloud connection actually has two channels. One for "read only" operations and another for DDL, and any SQLPlus scripts. That second channel works technically through SFTP and logically through the "Database Cart" where every db object or script is bundled into a ZIP for sending out to the cloud. Therefor you have to provide that information in the cloud connection wizard.
OK, so the last preparation step is to configure that "Database Cart". Goto: Tools > Preferences >Database > Utitlites > Cart > Cart Deploy and set the deploy directory according to you project needs.

Deploy DB Objects to the Cloud
After establishing the connections and configuring the Database Cart we are ready for deployment. Open Database Cart (View > Database > Database Cart) and Drag and Drop the DB Objects you want to deploy into the database cart.

Next: Click on Save

Click on Apply.
The selected db objects (metadata) will be saved as an XML File. The Database Cart File contains Metadata about the database objects you want to deploy. To have a better understanding: it looks like that

It is kind of configuration file for the deployment of database objects into the oracle cloud.
Next Step is to deploy the selected DB objects + data into a ZIP file which afterwards will be used to transfer into Oracle Database Cloud.

The ZIP contains the corresponding scripts in order to deploy the objects and data some where else (cloud). Actually it contains a bunch of SQL scripts:

Now the last part is to deploy that ZIP file to Oracle Cloud.

Press Apply.
The data now is exported and transferred as a Deployment Unit on your Database Cloud Service.
You can verify your deployment by refreshing the cloud connection in JDeveloper

and also look into the processing log

The newly created Table DEPARTMENTS can be verified/viewed right from JDevelopers Cloud Connection

Once again - How does it work?
The chosen DB Objects + Data are exported from a database and put together in a deploy.zip file. By providing the SFTP DB Service Account details this file is transferred to the cloud through SFTP. You can verify this by logging into your SFTP Account:

To summarize
- Configure Database Cart
- Drag and Drop DB Objects into Database Cart
- Deploy into Cloud
- Verify Processing through Deployment Status/ Log
- Verify deployed DB Objects through Cloud Connection right from the JDeveloper IDE
Having performed this steps next it is possible to build
- Apex Application
- ADF / Java EE Application
- RESTful Services
based on the deployed data structure. Stay tuned.
I really like that everything is bundled inside JDeveloper. No need to download any plugins or extra tools. Use JDeveloper to Build, Deploy DB and Java Applications (as I will show in the next post). Cool stuff! Goto cloud.oracle.com and try yourself!
Related Posts / Documentation
Subscribe to:
Posts (Atom)