Showing posts with label jdeveloper. Show all posts

Monday, June 30, 2014

How to use the Deck component (ADF 12.1.3 New Feature)

With the arrival of ADF 12.1.3 many new features has been introduced. One of those features is the brand new deck ui component. In this blogpost I want to give an example on how to use that new component.

Use Case

The use case is quite simple. Arrange pictures of soccer players in a grid. Once clicked on a picture it is flipped. On the backside you can see more details for the given player. Clicking once again on the card it flips back and shows the picture again. Let's look at the result:
Now clicking on the first pic it flips (with an animated transition) and show details.

How to implement

To implement the described use case create a panelGridLayout first with the following properties

  • row: Fixed height
  • cell: Fixed width, halign="stretch" and valign="stretch"

Inside each cell place the new af:deck component with two links as child components and two transition operations.
The commandLinks act as clickable cards on the deck. Each transition operation defines the desired animation when transitioning from one card to another. There are a lot of out-of-the-box transitions available as you can see in the screenshot.
Which card is currently displayed on the deck is controlled by the displayedChild attribute. It expects the component id of the given child ui component (in this case the af:commandLinks). The interesting piece of JSF Code for the sample to work is as follows:

To make the sample complete a backing bean is needed to handle the action events on each command link. Main task of the action listeners is to change the displayedChild attribut on the deck component and repaint it on the client (through a partial refresh)
While implementing the deck sample I did not want to use the deprecated af:commandLink. But converting it to af:link implies a JSF compilation error. So I switched back to the deprecated component.

Looks like the new Link Component is not fully compatible. Is this a bug?

Further Information


Sunday, December 2, 2012

Deploying ADF Applications into the Oracle Cloud using JDeveloper


In this post I am going to show how to deploy Oracle ADF Applications into the Oracle Cloud using JDeveloper.

Prerequisites / Environment
You should have the following at your hands.
  • JDeveloper (JDEVADF_11.1.1.6.0CLOUD_GENERIC_121118.1600.6229)
  • Oracle Cloud Java Service (which includes the database cloud service as well)
  • Oracle Database (HR Schema)
  • Having deployed the DB Objects and Data (HR.EMPLOYEES and HR.DEPARTMENTS) as described in the previous post
Note: In its current stage Oracle Java Cloud Service runs WebLogic Server 10.3.6 with the appropriate Runtime ADF 11.1.1.6. Deployment of ADF 11gR2 Applications is currently not supported. Beside this limitation some ADF Features are not supported on the Oracle Cloud. According to the Oracle Cloud Documentation it is not supported to use the following ADF features
  • ADF Desktop Integration
  • ADF mBean
  • ADF MDS (Seeded customizations or cross-session personalization)
  • ADF Mobile
  • ADF Active Data Services (=> No real-time ADF Web Apps in Oracles Cloud)
  • ADF Business Components services interfaces (web services) or events
  • ADF Data Controls for BI, Essbase, BAM, and JMX
Further there are some restrictions which are good to know I think
  • No Java Mail API   (=>Sending Mails is prohibited)
  • No File system access by deployed applications (=>Writing files is prohibited)
  • No Direct use of Oracle JDBC Driver APIs
  • No Java Message Service (JMS)
  • Max Size for deployment archive 95MB

I wonder what 'ADF Mobile' in that context actually means. Mobile Browser Apps? Or the restriction that ADF Mobile Client apps cannot make use of ADF BC SDOs? Maybe someone from Oracle could comment. That would be great. Thx!

Setup ADF Application
OK, let's do the actual work. In order to have shown the whole deployment procedure (database objects and ADF Application) we are going to create a basic ADF Application that is running against a non-cloud, on-premise database first using the well known DB schema HR  - involving table EMPLOYEES and DEPARTMENTS. Remember that these table structure + data has been deployed to the Oracle Cloud Database before.

I have created Business Components for the desired tables and build a simple master-detail Page for Departments and Employees. To verify the app is functioning as expected run in on the integrated WebLogic Server prior to deploying to the Cloud:

Looks good so far.

Prepare ADF Application for Cloud Deployment
Since we want to make the ADF Application connect to the Oracle Cloud Database Service we need to make sure the applications does the right DataSource Lookup. Therefore we need the right JNDI-Name which is pretty easy to find out. 

and take a look at the associated DataSource with your Java Cloud Service.

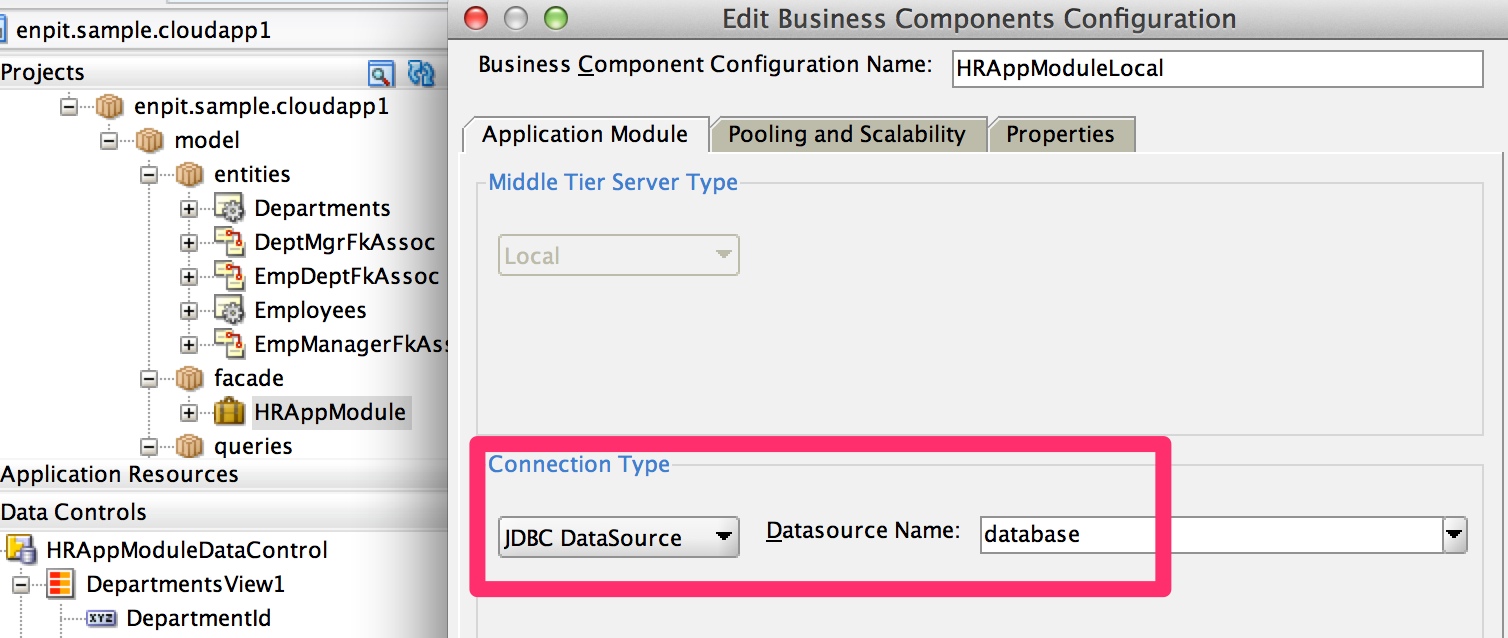
Now the remaining task is straight forward (at least for everyone who has configured ADF Applications in the past). Open the Application Module and adjust the default configuration accordingly. That means Connection Type = JDBC DataSource with the given name database.


Note: If you want to a single configuration for on-premise and cloud just make sure to create a datasource bound to JNDI Name 'database' in your integrated WebLogic Server.

Make the ADF Application publicly accessible
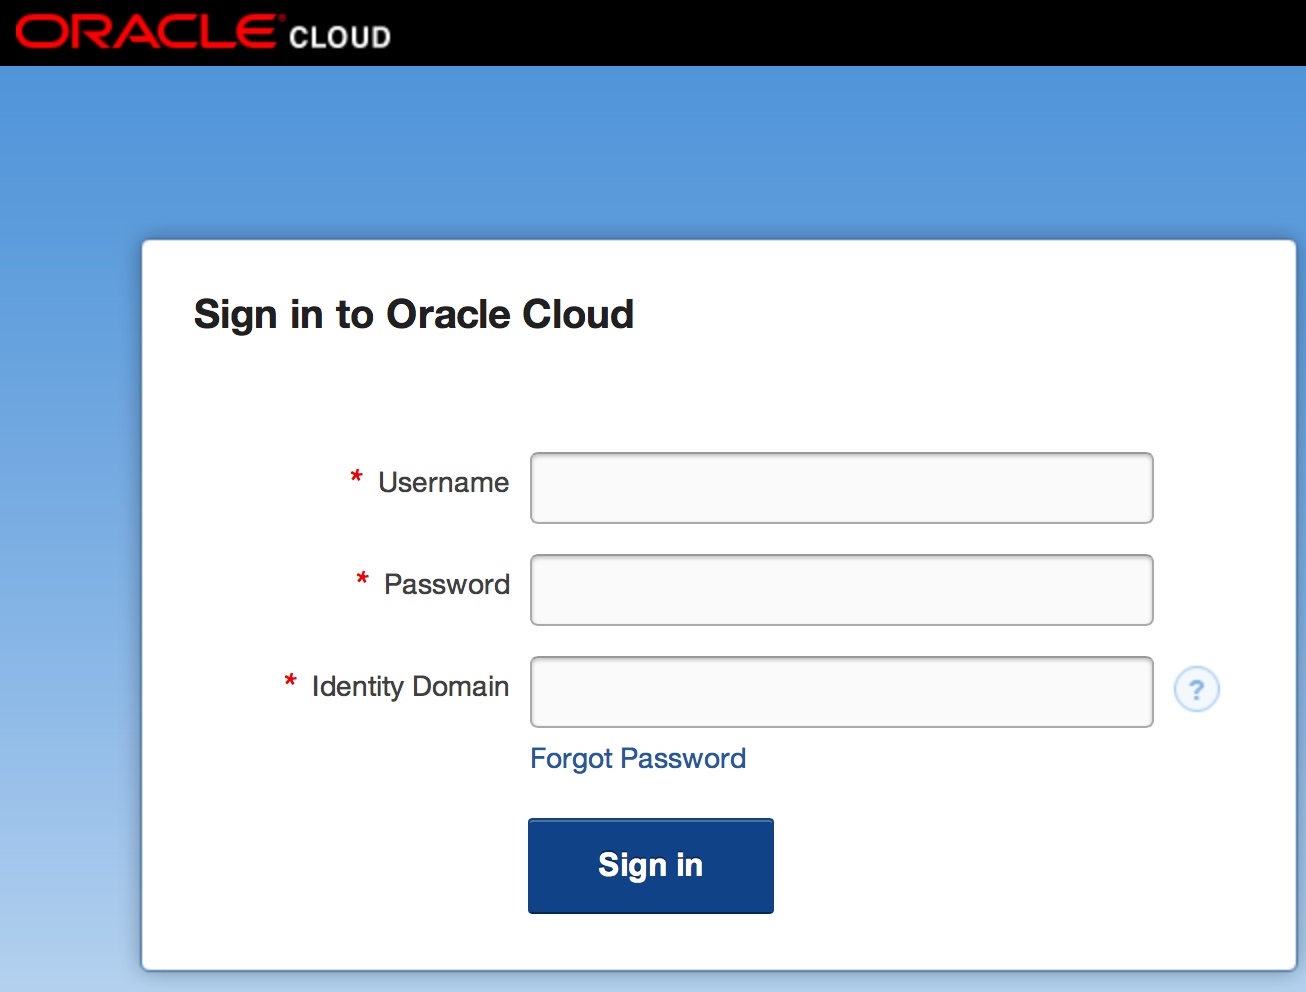
By default all ADF Application deployed to Oracle Cloud will be automatically secured! When users access the application they will be redirected to authenticate against the associated identity domain. The login screen will look like that

Since I want to make the ADF Application for everyone outside the identity domain accessible there is one simple configuration change in the web.xml descriptor needed.

Just add <login-config/> at the appropriate place and the app will be public.
That's easy. The application is now ready for the Cloud Deployment.

Deploy ADF Application to Oracle Cloud
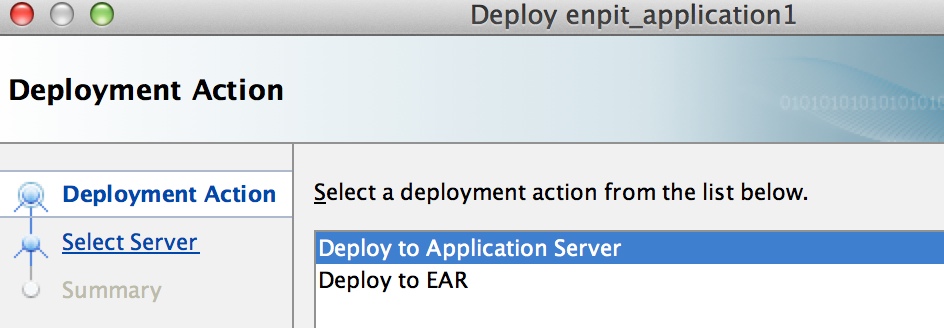
Goto 'Application > Deploy > 'deployment profile name'
[Deployment Wizard opens]

Select: Deploy to Application Server
Click: Next

Enter Connection Name: <some_conn_name>
Select Connection Type: Oracle Cloud
Click: Next

Enter Username: <Your Cloud Identity user name>
Enter Password: <Your password>


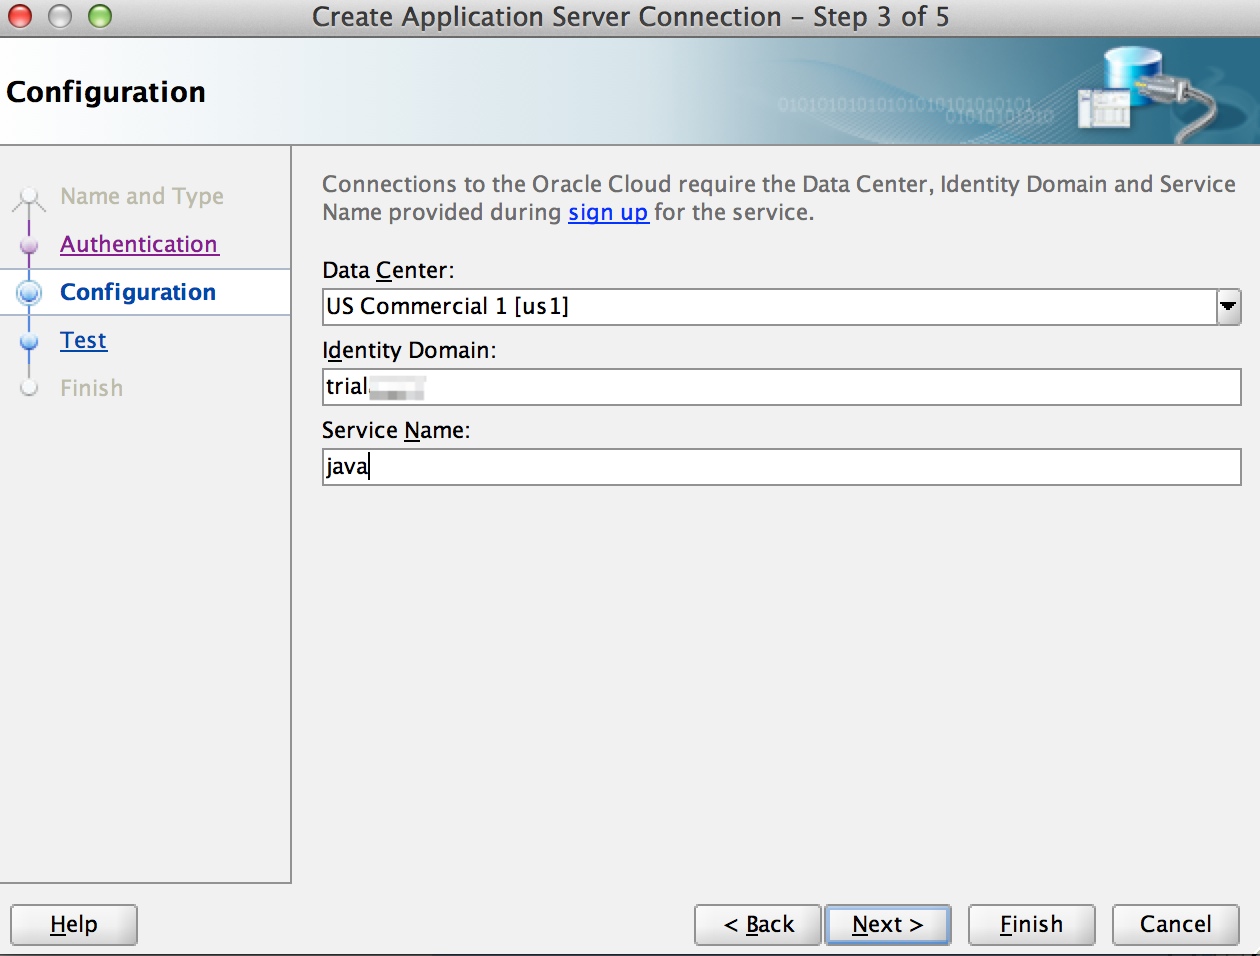
Select Data Center: <Data Center>
Enter Identity Domain: <Your identity domain name>
Service Name: <Your service name, by default it is java>
Click: Next

Test the cloud java connection
Click Next,

The ADF Deployment to the Cloud starts. Follow the processing in the Log window.
After less than 2 Minutes the ADF Application is available in the cloud. 
(If it is not available chances are high my trial oracle cloud account is expired ;) )

Some words on redeployment: On redeployment from the JDeveloper IDE the previously deployed app version is undeployed first. The the new app version is deployed as expected.

Summary 
  • Deploy DB Objects if needed to Oracle Cloud Database
  • Configure Application Module to use Connection Type JDBC DataSource, Name: database
  • Add <login-config /> to your web.xml to make the ADF Application public if needed
  • Setup up Oracle Cloud Application Server Connection
  • Deploy ADF Application via Cloud Server Connection
Conclusion
Everything worked as designed so far. No failure / exceptions occurred to me. Thanks Oracle! Great Work!

Related Posts / Documentation


Thursday, May 17, 2012

Java Heap Monitor in JDeveloper

Tested with JDeveloper Version 11.1.1.5, 11.1.2.1

Short post, but hopefully a useful productivity tip. Recently I thought if there isn't such a feature as I was used from some other IDEs
0000@2933_2933-41266b5f570d462a

Monitoring of the java heap size + the ability to force garbage collection.

Finally I found it as you can see from the screen shot above which shows my right bottom of JDeveloper Statusbar.

So how to activate this one? Well it is quite easy. Locate $MW_HOME/jdeveloper/jdev/bin/jdev.conf and add the following line at the bottom

AddVMOption -DMainWindow.MemoryMonitorOn=true

Restart JDeveloper and you should be able to see the java heap size monitor. Clicking on the recycle bin will force garbage collection.
0001@2933_2933-41266b5f592f684c

After garbage collection (in my just started jdeveloper) the used memory dropped from 200M to 105M
0002@2933_2933-41266b5f59d7cc6c

Conclusion
That might save you from restarting Jdeveloper to often a day;)

Further Reading
http://docs.oracle.com/cd/E25178_01/fusionapps.1111/e15524/gs_install_e.htm#CDEFEDGC

Tuesday, January 17, 2012

#ADF Talk Session 2 on Youtube

In ADF Talk Session 2 Ulrich and me dive a bit deeper into the details of PL/SQL Code integration by custom jdev extension. The video shows the usage of custom jdeveloper extension: Application Module from Database Package. See it in action.


Get updated on new sessions by following us on Twitter: @adftalk


Any feedback is greatly appreciated. Feel free to comment. Take also a look at Ulrichs Posts. There are already some comments related to the shown jdev extension.


Enjoy.

Sunday, January 1, 2012

ADF: MDS power user layer and "How to control MDS customizations at runtime"

Tested with: JDeveloper/ADF 11.1.1.2
Happy new year 2012 to all of my readers! First post this year is a follow up on "ADF: Define default UI for MDS user customization".
http://multikoop.blogspot.com/2010/01/adf-11g-define-default-ui-for-mds-user.html
Introduction
In that previous post I introduced a feature to be able to define a default UI layout at runtime by a specific user. That particular UI customization acts as the initial default for any other logged in users. That is great and simplifies developers life as the default layouting (which columns to display, in which order arrange, splitter posisions and so on) can be done by a business user.
Although those great capabilities there is still a lack of control regarding applied MDS customizations of specific users. In User Support situations it is often helpful to reset the user customizations to factory defaults in order to have the "same view on the UI".
So here is our solution how to be able to reset MDS Customizations at runtime for ALL users, or for specific users with regards keeping the power user defaults.
First recap that we have defined a special layer "DefaultUserCC"
0000@2752_2752-41266a4f4bf6e5d5
With this Customization class configured it is now possible to login as the user "layout" and define the default UI for all other users. It just means that the DefaultUserCC customizations are applied before the UserCC. (So the order of the CCs in the above screen is important!)
(You can test the behaviour with attached sample application based on ADF11.1.1.2. See download link at the end of this post)
Sample application
0001@2752_2752-41266a4f51401846
Two test users bob and alice and the power layout user "layout".
1. Login as layout
2. Remove all rows except Firstname and Lastname, Email.
0005@2752_0004@2752_2752-41266a4f52fc9630
3. Logout layout
4. Login as bob
0006@2752_0005@2752_0004@2752_2752-41266a4f52fc9630
[Notice that bob has inherited the ui settings from user layout]
5. Now Remove the email column
0007@2752_0002@2752_2752-41266a4f523ef500
6. Logout bob
[Imagine: You get a support call from user bob. He says he is not able to lookup the email adress. To simplify further investigations you should be able to get his user layout back to default.]

7. Login as layout (or in general as an MDS Admin)
8. Enter username: bob
0008@2752_2752-41266a4f5894ab6d
9.Click "Reset to layout user defaults"
As feedback you will get
0009@2752_2752-41266a4f58efb11d
[Imagine: In Support case you would now advise the user to login again. From that moment you can be sure user bob has same ui layout as defined by the user layout.]
Wow. This is a really powerful feature I think. Is there any other web app framework which can do this? ;)
How we do it: Delete MDS documents at runtime
To implement the mentioned features there is not really much to do (beyond the basic MDS configuration which I will not describe here. See references for details.)
1. Implement and configure custom Customization Class (Here: DefaultUserCC.java)
2. Use Oracle MDS API to delete MDS documents. To find how this actually can be done I followed to approaches. a) Reverse engineeer from deleteMetadata WLST command. b) Google.
Option a guided me through
oracle.mds.internal.lcm.mbean.AppRuntimeMBeanImpl
   public Map deleteMetadata(String[] docs, String[] custNames, boolean excludeAllCust, boolean excludeBaseDocs, boolean excludeExtendedMD, boolean cancelOnException)

oracle.mds.internal.lcm.MDSLCMManager
   Map deleteMetadata(String[] docs, String[] custNames, boolean excludeAllCust, boolean excludeBaseDocs, boolean excludeExtendedMD, boolean cancelOnException, Locale locale)
      ...
      doDelete(...)

  List doDelete(MetadataStore store, String[] docs, boolean excludeAllCust, boolean excludeBaseDocs, boolean excludeExtendedMD, boolean cancelOnException, TypeConfig typeConfig, CustConfig custConfig, List custLayerFilterList, DependencyConfig dConfig)
       ...
       TransferUnitList transferUnitList = TransferUnitList.create(mdsInstance, docsList, transferOptions, !excludeBaseDocs, true);
       List resultList = MDSTransfer.getInstance(mdsInstance).delete(transferUnitList, cancelOnException);
       ...
oracle.mds.internal.transfer.InternalMDSTransfer
    delete ...
    execute....

Option b guided me to a some really great resources. 1. http://oraclemw.blogspot.com/2011/04/working-with-oracle-mds-repository.html 2. http://idmclub.wikidot.com/metadata-store where I found some basic information on the usage of the MDS API.
Finally I came up with a MDSUtils.java and MDSAdminBean.java which does the needed work.
Here are the most important code snippets
MDSUtils.java
public static void deleteDocuments(final MDSInstance mdsInstance,
final List listOfFiles) throws MDSException {

MDSTransfer transferInstance = MDSTransfer.getInstance(mdsInstance);

TransferUnitList transferUnitList =
TransferUnitList.create(mdsInstance, listOfFiles, null, true,
true);
transferInstance.delete(transferUnitList, false /* cancelOnException */);
transferInstance.release(mdsInstance);
}

public static List queryAllFiles() {
final MDSSession mdsSession = MDSUtils.getCurrentMDSSession();

//String packagePath, String documentName, boolean recursive,
final NameQueryImpl nameQuery =
new NameQueryImpl(mdsSession, ConditionFactory.createNameCondition("/",
"%",
true));
final Iterator result = nameQuery.execute();
final ArrayList listOfFiles = new ArrayList();
while (result.hasNext()) {
final QueryResult qr = result.next();
final String absoluteName = qr.getAbsoluteName();
listOfFiles.add(absoluteName);
}

return listOfFiles;
}


MDSAdminBean.java


Nothing special here. Just use the "hard worked out";-) MDSUtils in action listern methods, e.g.


List listOfFiles =
MDSUtils.queryFilesMatch("/mdssys/cust/user/" + username);
try {
System.out.println("MDS Admin: Deleting " + listOfFiles);
MDSUtils.deleteDocuments(listOfFiles);
FacesContext.getCurrentInstance().addMessage(null,
new FacesMessage(FacesMessage.SEVERITY_INFO,
null,
"Deleted the following MDS-Documents for user " +
getUsername() +
": " +
listOfFiles));
} catch (MDSException e) {
e.printStackTrace();
}


Download the application and checkout the customization possibilities with bob, alice and layout!

http://www.box.com/s/kvjc43my8mbvoyi9lh3v (JDev 11112 Workspace)


References


User Customization with and without MDS

http://blogs.oracle.com/raghuyadav/entry/user_customization_with_and_wi


Programmatic access to Oracle Metadata Store (MDS)

http://idmclub.wikidot.com/metadata-store


Working with Oracle MDS Repository (MetaData Services)

http://oraclemw.blogspot.com/2011/04/working-with-oracle-mds-repository.html


ADF: Define default UI for MDS user customization

http://multikoop.blogspot.com/2010/01/adf-11g-define-default-ui-for-mds-user.html

Tuesday, December 20, 2011

Custom ADF Skin: Consume as Library

Tested with JDeveloper: 11.1.2.1.0
Main purpose of this post is for me to have a reference project and proof of concept using an ADF Skin as Library.
Part 1: Skin Application
So first the ADF Skin project should be created. Since JDevR2 this process has been simplified by new ADF Skin wizard.
0000@2728_2728-41266a37beff9ee9
In the next screen just give your skin a name and extend from the fusionFx-simple-v2.desktop Oracle Skin. It is specially designed with extensibility in mind for cusom skins. Fortunataly the recommended skin is selected. (It is not with every ADF/Jdeveloper feature ;). So well done Oracle!
0001@2728_2728-41266a37bfbbbbbc
The following bunch of things is created on the fly
0002@2728_2728-41266a37c0ee2cc1
Now lets create a "green" skin with smallest amount of modifications. This is achieved by opening the CSS file and
go to the "Images" View. Just change some of the colors.
0003@2728_2728-41266a37c2b9d648
And afterwards click "Apply to Skin"
=> This will generate a lot of images according to your color schema.
0004@2728_2728-41266a37c3487043
In order to support versioning of skin I am adding the following to the trinidad-skins.xml
   <version>
     <name>v1</name>
     <default>true</default>
   </version>
=>
0005@2728_2728-41266a37c41b4e82
Now we are ready to bundle the custom skin as ADF library. There is nothing special here. Create the Deployment profile, keep defaults and deploy.
Next step is to test the provisioning of the ADF Skin through ADF Library through File System connection. To do that we create a filesystem connection in the resource pallete
0006@2728_2728-41266a37c59fab0c
The Skin shows up as expected
0007@2728_2728-41266a37c5c8a0ce
Part 2: Consume ADF Skin
a) Create an pure empty Fusion ADF Application by wizard.
b) Select the ViewController project
c) Select adflib-myskin.jarm Right Click and Click add to Project
0008@2728_2728-41266a37c70bc1cd
The Message Pane should output something like
These ADF Library jar items are now in ViewController.jpr
{
  file:/C:/ak/JDeveloper/mywork/TestADFSkin/MySkin/deploy/adflib-myskin.jar
  These are in the project as a result of your ADF jar imports:
  Resource Bundle Variable Resolver from .../TestADFSkin/MySkin/MySkin.jpr
}
d) Apply custom ADF Skin as default in Project Properties>ADF View
0009@2728_2728-41266a37c7b425ed
e) Create a simple JSF Page based on the threeColumnTemplate and  take a look
0010@2728_2728-41266a37c94320ff
At Design-Time there seem to be some problems.
At Runtime it looks as expected
0011@2728_2728-41266a37cb518a6e
Is it a Bug at Design Time?
Using just a QuickLayout everything is as expected also in design time
0012@2728_2728-41266a37cd2f684c
Download Sample Workspaces: http://www.box.com/s/h8mggth460ntujhg7o3r

Tuesday, November 22, 2011

ADF Talk on Youtube started

Today Ulrich and me started a series of sessions on ADF Topics.

In ADF Talk Session 1 we are introducing a way to integrate PL/SQL Code into ADF fusion applications. The video shows the usage of custom jdeveloper extension: TEAM Application Module from Database Package. See it in action.

Friday, November 11, 2011

JDev 11.1.2.1 – Clear WLS Log tab Bug?

Applies to JDeveloper: 11.1.2.1

Problem Description

After starting the integrated WLS from JDev the wls log is displayed in the log tab. Open mouse context menu and “clear” item is not activated

image

I have no chance to clear the log tab!! Arghh.

Is there any good reason for this behaviour? ( not beeing able to clear the log). The memory consumption is already enormous. Dear Oracle, please let me clear the log tab again…

Never seen this issue in 11gR1 versions.

Is there any workaround?

Saturday, October 8, 2011

[solved] Download offline bc4j-junit_bundle 11.1.2.1 version/download link mismatch

Applies to: JDeveloper 11.1.2.1

Download from: http://www.oracle.com/ocom/groups/public/@otn/documents/webcontent/131167.xml#oracle.BC4J.junit

Problem description

Trying to install the downloaded bc4j-junit_bundle offline version as extension I get the following error

0001@2612_2612-412669a31839a5bc

Analysis

Open the corresponding bundle ZIP an lets see if it is really wrong version

0000@2612_0-412669a316db363c

But as you can see I have downloaded the correct version. So there is a mismatch.

Solution

After further investigating the download link I realized that it just references the old version

http://download-llnw.oracle.com/otn-pub/jdeveloper/11.1.2.0.0/extensions/bc4j-junit_bundle.zip

So let's try to adjust manually the URL und download

http://download-llnw.oracle.com/otn-pub/jdeveloper/11.1.2.1.0/extensions/bc4j-junit_bundle.zip

é voilà now the installation works fine as well

0002@2612_2612-412669a3198bf259

[solved] JDeveloper - Install Extensions offline / licences check issue

Applies to: JDeveloper 11.1.2.1

Issue

0000@2607_2607-412669a3102f0735

Results in

0001@2607_2607-412669a31054f43e

The impact is that you are unable to install JUnit-Extension in a Workshop Lab e.g. where

you can't assume that the attendees have an internet connection

Workaround

Because we are quite smart let's workaround....

Open Bundle with your favourite archiver tool

and remove or comment out the following line

<u:requires-agreement url="http://junit.sourceforge.net/cpl-v10.html" />

0002@2607_2607-412669a312de3ef5

Save change and Update Archive.

Import extension again.

0003@2607_2607-412669a3138e38e4

=> No license check requirement shows up. Yeeeees we can!

Monday, October 3, 2011

Upgrade Oracle Team Productivity Center to 11.1.2.1 / Hudson Plugin

From Version: 11.1.1.5 
To Version: 11.1.2.1

Prepare

Check the content of the current otpc schema

SQL> select * from otpc_version t;

                 ID       DB_UPGRADE_NUM DB_VERSION                                                                    VERSION

-------------------- -------------------- ---------------------------------------------------------------- --------------------

                  1                    2 11.1.1.5.37.60.13                                                                   1

Download tpcinstaller.jar from OTN

Installation

Start new installer

jar -jar tpcinstaller.jar

0000@2570_2570-41266996bfbd4018

Click Next

0001@2570_2570-41266996c019ca25

Great: The installer recognized everything, so you really can expect the installation process will do the right thing

Choose: NExt

0003@2570_2570-41266996c1f19691

Point to the autodeploy directory of the privious installation. If you just point to the DOMAIN_HOME Location you will get an exception:

0004@2570_2570-41266996c22e4506

TPC-90026: The otpc.war of current installation for upgrade is missing in the server deployment directory

(Enhencement request: The installer should be smart enough to be able to check for otpc.war in the given domain!)

0005@2570_2570-41266996c4153d10

Choose: Next

0006@2570_2570-41266996c433944a

Choose: Next

0007@2570_2570-41266996c44a55b6

...

0008@2570_2570-41266996c45e0e69

...

0009@2570_2570-41266996c4765432

Upgrade completed. Plus Hudson Plugin installed.

Verify installation/ Upgrade

Verify  otpc_version in database schema:

SQL> select * from otpc_version t;

                 ID       DB_UPGRADE_NUM DB_VERSION                                                                    VERSION

-------------------- -------------------- ---------------------------------------------------------------- --------------------

                  1                    2 11.1.2.1.38.60.81                                                                   2

SQL>

Everything worked as expected. Nice.

Lets start weblogic and check if otpc server is running

0010@2570_2570-41266996c6ebe636

Seems to run, but (as stated in one of my privious posts) nobody can be sure which version actually is running. Especially from an ALM tool which now integrates with hudson I REALLY CAN EXPECT to see a BUILD-Number here! Dear Oracle, if you are reading this, please log an enhencement request to integrate a build number in the otpc server homepage! Further it would be nice if that homepage lists all installed otpc plugins (plus which version of course). Thanks.

BTW:

After starting the new otpc server a new folder has been created in DOMAIN_HOME

activemq-data

=> Oracle uses ActiveMQ now. I think in order to be able multi app server compatible. And ActiveMQ is obviously tinier than the WLS one.

OTPC Hudson Plugin

Now I am really interessted in how the hudson plugin looks like. So lets start my local hudson sanbox.

java -jar hudson-2.1.1.war -httpPort=8081 (8080 is used by the XE DB)

Observing the Hudson > Plugin Manager > Installed

=> No hints to a newly installed plugin

Looking into Hudson > Plugin Manager > Available

=> Bingo.

0011@2570_2570-41266996ce3bec47

(Additional info. The plugin has been put to

$HUDSON_HOME/HudsonTpcPlugin.hpi

by the OTPC installer and not into the $HUDSON_HOME/plugins/ as I would expect.)

Ok, move on

0012@2570_2570-41266996ceed6a92

Restart hudson.

The otpc plugin shows up in the installed section of the plugin manager.

0013@2570_2570-41266996cff6e5d5

So now we can use the plugin in our hudson jobs. Choose your job and configure..

0014@2570_2570-41266996d1950c84

Save changes and run your job.

Check the jobs console output

"The test result(s) Testergebnis will be sent to the Oracle Team Productivity Team Server at http://localhost:7001.

Successfully loggedin."


Thats all so far. Nothing else shows up in your hudson ui ;-(


What's next


Check OTPC in new JDev 11.1.2.1


0015@2570_2570-4126699b4bcdf012


0016@2570_2570-4126699b4bec474d


0017@2570_2570-4126699b4c0795cf


Let's open an old task repository


0019@2570_2570-4126699b51493271


Hhhm. let's create a new task repository


0018@2570_2570-4126699b4e450673


Same problem here.


Conclusion


OTPC is still not enterprise ready. OTPC should improve in the following


  1. Task repository connection does not work in new version! Wow. Where is the mistake? the server logs


WARNUNG: RepositoryServerServiceImpl.getAll() 10/03/2011 17:43:29 MESZ - reposit


ory server 'New Repository Server11121'  does not have any parameters by parentN


ame 'REPOSITORY_SERVER.New Repository Server11121.OTCP Task Repository11121'.


03.10.2011 17:43:29 oracle.alminternal.server.core.RepositoryServerServiceImpl g


etAll


  1. Integration BUILD-Number into otpc server homepage


  2. List installed connectors on otpc server homepage


  3. Integrate LDAP vor OTPC Users/Groups. Provide a mapping from those users/groups to OTPC Roles


  4. Integrate some nice charts in the hudson jobs webpages ;)


Like (in general about OTPC)


  1. Saving the IDE context for a specific task.!! This really rocks!