Saturday, December 1, 2012

Deploying Database Objects to Oracle Cloud using JDeveloper


As announced in my previous post I am going to show now how to deploy Database Objects from a "local" Database to the Oracle Database Cloud. For that showcase I am using the following environment

Environment
  • JDeveloper (JDEVADF_11.1.1.6.0CLOUD_GENERIC_121118.1600.6229)
  • Oracle XE Database 11gR2 with HR schema
  • Oracle Database Cloud Service
Goal
The primary goal is to deploy the tables HR.DEPARTMENTS and HR.EMPLOYEES into the Cloud Schema. So in a next step it will be possible to build an Apex or an ADF Application associated to these tables in the cloud.

Prepare DB Deployment
In order to use the tools provided in JDeveloper for seamless deployment of DB objects into the Oracle Cloud start JDeveloper and open the Database Navigator (View > Database > Database Navigator)

Now create an IDE DB connection to the desired database. I am using the well known HR schema on an Oracle XE DB. This is really straight forward. Just click "+" and add a Database Connection by providing the appropriate account details. Double Click on the created node connects to the database and explores its contents.


Next we need to connect to the Oracle Cloud Database Service. That is pretty simple too.

Enter your cloud service details


et voila, the cloud connection is established!
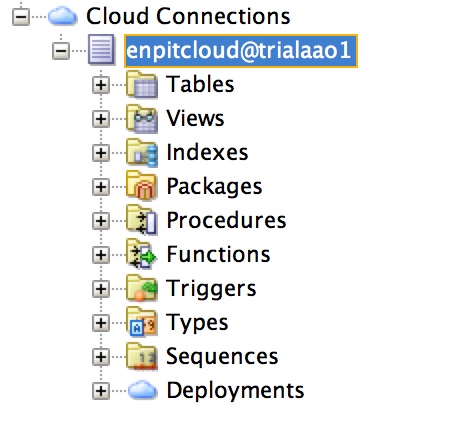

Important note: Before we go further let me explain the cloud connection details because this is really new and should be noted. The cloud connection actually has two channels. One for "read only" operations and another for DDL, and any SQLPlus scripts. That second channel works technically through SFTP and logically through the "Database Cart" where every db object or script is bundled into a ZIP for sending out to the cloud. Therefor you have to provide that information in the cloud connection wizard.

OK, so the last preparation step is to configure that "Database Cart". Goto: Tools > Preferences >Database > Utitlites > Cart > Cart Deploy and set the deploy directory according to you project needs.


Deploy DB Objects to the Cloud
After establishing the connections and configuring the Database Cart we are ready for deployment. Open Database Cart (View > Database > Database Cart) and Drag and Drop the DB Objects you want to deploy into the database cart.
Next: Click on Save

Click on Apply. 

The selected db objects (metadata) will be saved as an XML File. The Database Cart File contains Metadata about the database objects you want to deploy. To have a better understanding: it looks like that


It is kind of configuration file for the deployment of database objects into the oracle cloud.

Next Step is to deploy the selected DB objects + data into a ZIP file which afterwards will be used to transfer into Oracle Database Cloud.


The ZIP contains the corresponding scripts in order to deploy the objects and data some where else (cloud). Actually it contains a bunch of SQL scripts:


Now the last part is to deploy that ZIP file to Oracle Cloud.

Press Apply.

The data now is exported and transferred as a Deployment Unit on your Database Cloud Service.
You can verify your deployment by refreshing the cloud connection in JDeveloper

and also look into the processing log


The newly created Table DEPARTMENTS can be verified/viewed right from JDevelopers Cloud Connection


Once again - How does it work?
The chosen DB Objects + Data are exported from a database and put together in a deploy.zip file. By providing the SFTP DB Service Account details this file is transferred to the cloud through SFTP. You can verify this by logging into your SFTP Account:


To summarize
  • Configure Database Cart
  • Drag and Drop DB Objects into Database Cart
  • Deploy into Cloud
  • Verify Processing through Deployment Status/ Log
  • Verify deployed DB Objects through Cloud Connection right from the JDeveloper IDE
Having performed this steps next it is possible to build 
  • Apex Application
  • ADF / Java EE Application
  • RESTful Services
based on the deployed data structure. Stay tuned.

I really like that everything is bundled inside JDeveloper. No need to download any plugins or extra tools. Use JDeveloper to Build, Deploy DB and Java Applications (as I will show in the next post). Cool stuff! Goto cloud.oracle.com and try yourself!

Related Posts / Documentation


Friday, November 30, 2012

Oracle Java and Database Cloud Services in Action


Yesterday the long awaited  Oracle Cloud became reality (at least for me)! Thanks Oracle! Of course I could not wait any longer and had to do a test drive with the Oracle Database and Java Cloud Services. In order to start we need the following

Getting started
Once you confirm your activation link for the trial request you will receive an email with Service Details for
  • Identity Domain (which actually is a logical group for associated Users and Cloud Services)
  • Oracle Database Cloud Service
  • Oracle Java Cloud Service
  • Domain FTPs Account Details
In the mail there also will be a temporary password which must be changed after first login at the Identity Console. One thing really overwhelmed me is the fact that for every service you get dedicated user credentials. So there is a lot of stuff that is to be handled.

Identity Domain / Console
The Identity Domain actually is a logical group for associated Users and Cloud Services that is managed by the Identity Domain Administrator. The Identity Console is a web based application for 
  • Manage  User Profile
  • Create / Delete Users, Reset Passwords
  • Create / Delete Roles, Assign to Users
The Identiy Console is build with ADF. It looks like that


Oracle Database Cloud Service 
The Oracle Database Cloud Service runs Oracle DB 11gR2 and is managed by Apex 4.1.1.00.23. So logically no ADF here. Imagine you are running Oracle XE. Same here.

RESTful Services (by Application Express Listener)
RESTful services are created inside Apex and are delivered right from the Database through the Apex Listener

The defined RESTful Services can be tested right from the browser:

As you can imagine this allows pretty rapid development of RESTful Services! Beside JSON, CSV Format is supported. No XML!


As a sample DB application the following Apex App is installed and by default to demo key features of Oracle Apex! Further Apex applications can be easily deployed from the apex Workspace.


DB Export
In order to export Database strucure + data it is possible to trigger a data pump job with a single Mouse Click. After the job is completed the Dumpfile can be grabbed through SFTP from the /download user directory. The created files are automatically cleaned up after about 2 days. So do not try to archive your data here.


My test worked well without any trouble! The download speed was acceptable to although I did not download Gigs of data.


Access DB Schema
Now let us come to the  interesting part. How can we access the DB Schema from - e.g. SQLDeveloper or JDeveloper. In this case I will demo it from the new JDeveloper 11.1.1.6 (Build 6229) 

In order to access the Database Cloud service from the IDE we need a so called "Cloud Connection User" to be created in the database service console (Apex) with the SQL Developer Group as stated in the JDeveloper context help. This can can be easily done through the Apex Admin Tools (Manage users and groups). I won't go into further details here.

Now it is possible to create the connection from JDeveloper/SQLDeveloper

Enter your service details


and we are up and running, being able to see the structure and contents of the cloud database instance. 

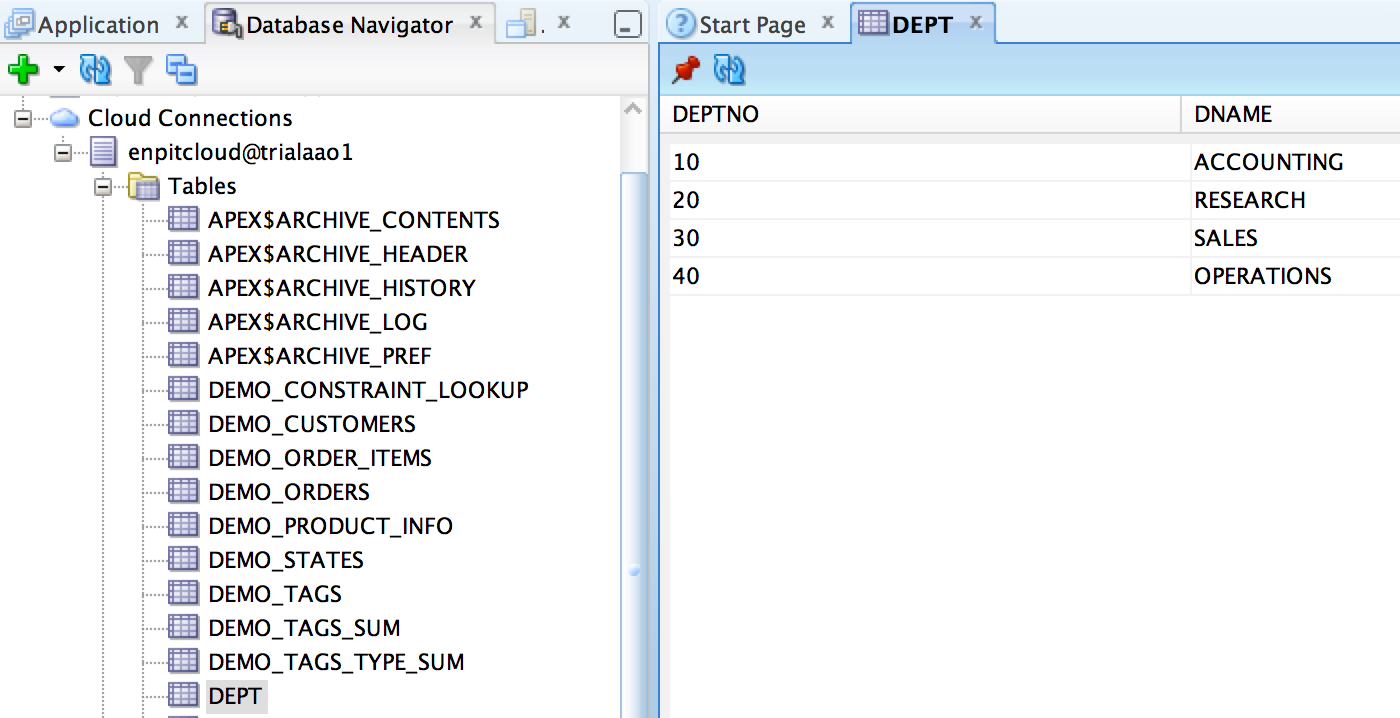
Access for example the table 'DEPT' and browse the data.
(The Tables EMP and DEPT are included in the cloud db schema)

The interesting part here is that it is not possible to change any database objects.

Deploying DB Objects is only possible through the newly introduced "Database Cart" which is accessible from "View > Database > Database Cart". 

That is a very new concept which needs a separate focus. More on that in a follow up post (Deploying Database Objects to Oracle Cloud using JDeveloper). Follow me on twitter to get updated in time (@multikoop)

Oracle Java Cloud Service Control
To monitor, deploy/undeploy start/stop Java and ADF Applications. It looks pretty simple and easy to use: Performance, Data Sources, Applications. Everything you need to get started.

This control is a subset of Oracle Enterprise Manager Cloud Control 12cR2 (12.1.0.2) as you can see in the about page.

In one of the next posts I am going to show how to "Deploying ADF Applications into the Oracle Cloud". Stay tuned.

Conclusion

In its current stage Oracle Cloud is promising Cloud Foundation for PaaS and SaaS. It includes
  • Identity Management / WebBased Identity Console (ADF Application)
  • Java Cloud Service Control to Monitor and Deploy your Java Applications (ADF Application)
  • Apex Control to Administer and Monitor Apex DB Applications and Cloud Connection Users
  • IDE Integration in JDeveloper 11.1.1.6 (Build 6229)
  • Oracle Cloud Java SDK Command Line Interface
  • IDE Integration in Oracle Enterprise Pack for Eclipse.
  • IDE Integration in Netbeans is on its way....
References

Start your cloud experience now! Goto http://cloud.oracle.com

Sunday, November 4, 2012

ADF: Smart Input Date Client Converter


Environment
  • Tested with JDeveloper / ADF 11.1.2.3
  • (Should also work for 11.1.1.x)
Use Case

To improve the User Experience in heavy data entry ADF applications for "extreme keyboard users" it would be great to have the ability to enter dates by some typical conventions, e.g.

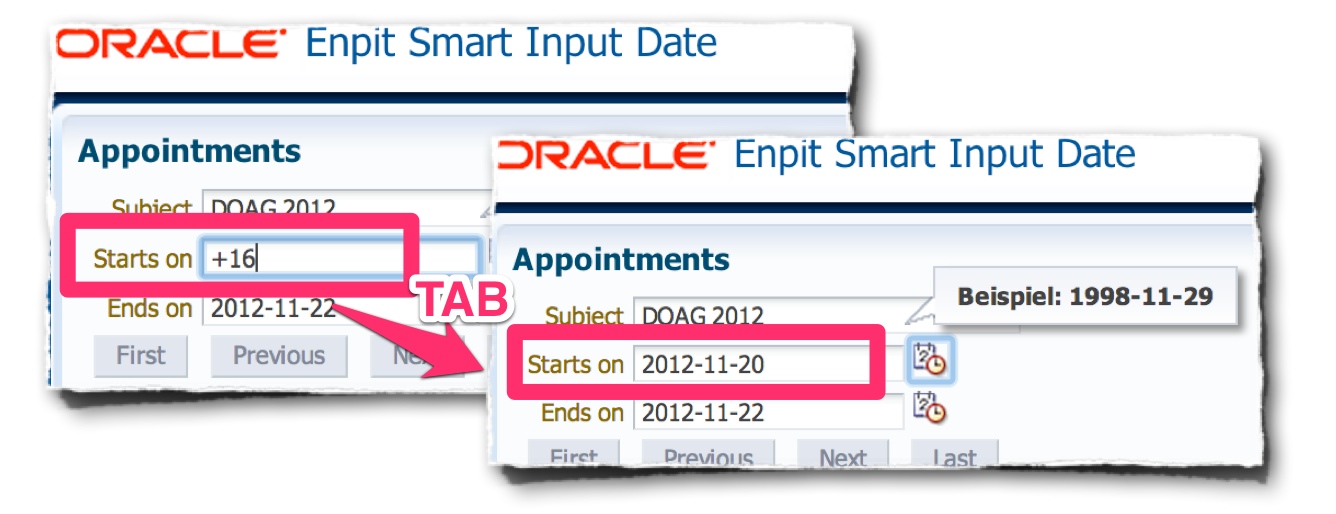
  • Type t or T or today, tab out the input field and get the current date: 2012-11-04
  • Type +7, tab out the input field and get the current date +7 days: 2012-11-11
  • Type -7, tab out the input field and get the current date -7 days: 2012-10-28
The following use cases shows the +16 feature entered on 2012-11-04

How to do it

We are going to implement a custom client converter to get the desired result. The default functionality will be inherited from the given trinidad org.apache.myfaces.trinidadinternal.convert.DateTimeConverter since we want to keep the default conversion behavior for a given pattern. 

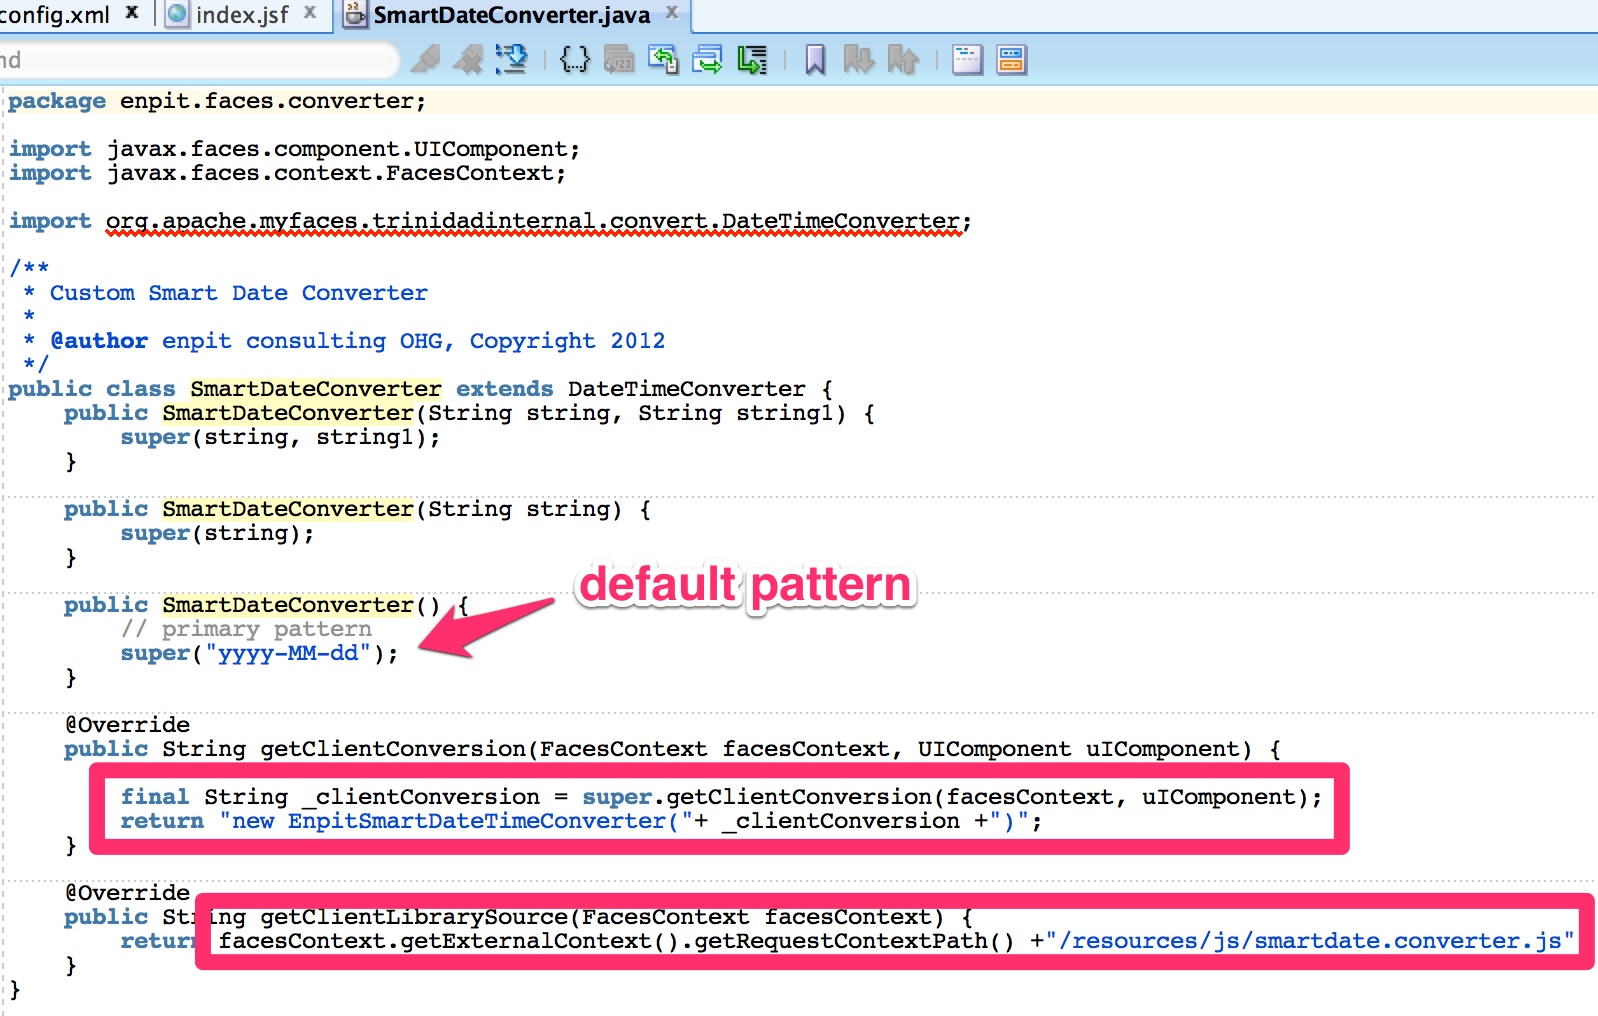
The server side implementation is quite easy. The only thing we override is the getClientConversion(..) and getClientLibrarySource(..) methods which are part of the org.apache.myfaces.trinidad.convert.ClientConverter interface.

The most interesting part is to wrap the default client converter implementation and put it into our own client javascript converter. The default date pattern can be set in the constructor.

The javascript Converter version uses the given default converter as a delegate and just implements to handle the special cases.

/resources/js/smartdate.converter.js

/**
 * Custom Client-Converter for smart date entry
 *
 * Copyright 2012 - enpit consulting OHG, www.enpit.de
 */


function EnpitSmartDateTimeConverter(trDateTimeConverter){
    this._trDateTimeConverter = trDateTimeConverter;
}

EnpitSmartDateTimeConverter.prototype = new TrConverter();


EnpitSmartDateTimeConverter.prototype.getAsObject = function(
  parseString,
  label){  

      try {
      if( parseString == "t" || parseString == "T" || parseString == "today"){
          return new Date();    
      }

      if( this._startsWith(parseString, "+") || this._startsWith(parseString, "-")){
          if(parseString.length == 1){
              // delegate to TrDateTimeConverter
              return this._trDateTimeConverter.getAsObject(parseString,label);
          }
          var _parsedDate = new Date();
          var _parseDays = parseInt(parseString.substring(1,parseString.length));
          var _millis =  _parseDays*86400000;
          if(this._startsWith(parseString, "-")){
            _millis = _millis*-1; 
          }
          _parsedDate.setMilliseconds( _parsedDate.getMilliseconds() + _millis );
          return _parsedDate;
      }

      } catch (e){
          // delegate to TrDateTimeConverter
          return this._trDateTimeConverter.getAsObject(parseString,label);
      }

    // delegate to TrDateTimeConverter
    return this._trDateTimeConverter.getAsObject(parseString,label);
}


EnpitSmartDateTimeConverter.prototype.getAsString = function( formatTime ){
    return this._trDateTimeConverter.getAsString(formatTime );
}

EnpitSmartDateTimeConverter.prototype.getFormatHint = function() {
    return this._trDateTimeConverter.getFormatHint();
}

EnpitSmartDateTimeConverter.prototype.setDiffInMins = function( offset )
{
    this._trDateTimeConverter.setDiffInMins(offset);
}

EnpitSmartDateTimeConverter.prototype.getDiffInMins = function()
{
  return this._trDateTimeConverter.getDiffInMins();
}

EnpitSmartDateTimeConverter.prototype.getLocaleSymbols = function()
{
  return this._trDateTimeConverter.getLocaleSymbols();
}

EnpitSmartDateTimeConverter.prototype._startsWith = function(
  value,
  prefix
  )
{
    if(value == null){
        return false;
    }
    return (value.indexOf(prefix) == 0);
}

Register the custom converter in faces-config.xml


Enter ID: enpit.faces.SmartDate
Enter Class: enpit.faces.converter.SmartDateConverter

Now we are able to use the smart DateConverter on our inputDate components, all declaratively with IDE support.

Just drag and drop the f:converter from the component palette onto the desired inputDate component 

so that it looks like

Let users enjoy the smart date input. They will love it!

Conclusion / Summary
  • Implement Custom Server Side Faces Converter
  • Implement JavaScript Client Converter
  • Register Converter in faces-config.xml
  • Use Converter from Component Palette

Further Information

Download Sample

Friday, October 12, 2012

Overview Administration of ADF Applications

Today I had the pleasure to give a presentation on the topic "Administration of ADF Applications" on the regular web conferences of the German ADF Community.

I have covered topics (not every part in detail) that are needed in order for sucessfully administering ADF Applications.

  • Oracle ADF Architecture Overview
  • Setup WebLogic for ADF Applications
  • Deploying ADF Applications
  • Monitoring and Configuring ADF Applications
  • ADF WLST Commands
  • JVM Diagnostic / Tools
  • Security Provider / Policy Configuration
  • MDS Configuration

Friday, September 28, 2012

ADF Essentials in the RedHat Cloud (Glassfish / OpenShift)

VERSIONS / PLATFORM

ADF 11.1.2.3
GlassFish 3.1.2.2
RedHat OpenShift Cloud

INTRODUCTION

In this post we (Ulrich @GerkmannBartels (http://maybe-interesting.blogspot.com),@multikoop, www.enpit.de) are going to show how to setup the runtime environment for running ADF Essentials Applications on Glassfish in RedHats OpenShift Cloud. For the moment we are not going to connect to any database. What we are actually going to show is
  • Setup Glassfish on OpenShift Cloud
  • Configure appropriate JVM settings
  • Install ADF Share Libraries into Glassfish Domain
  • Deploy ADF Essentials Application (currently with no database access)

SETUP GLASSFISH ON OPENSHIFT CLOUD

Step 1: Sign up for free OpenShift account (if needed)
Goto https://openshift.redhat.com and register for a free account if you do not have one yet.
All you need is a valid emailadress. You will get 1.5G Memory and 3G Storage

Step 2: Create new Cloud Application
Login through the web interface and create a new application, i.e. adf with the Do-It-Yourself Catridge. This is pretty easy. Just log into your Openshift account and choose create application. Choose the following catridge


After that, just follow the instructions and you are done. This is really easy. Believe me!

Step 3: Prepare your client for the cloud
Well, this actually depends on your OS. You can read a detailed instruction about it here: https://openshift.redhat.com/community/get-started

On a Mac: Open Terminal and enter:

enpitmac:~ak$ sudo gem install rhc
Password:
Successfully installed jruby-pageant-1.1.1
.......
enpitmac:~ak$ 


This will install the RedHat Client tools. Test the availability of rhc via

enpitmac:~ ak$ rhc -version
rhc 0.98.16
enpitmac:~ ak$ 


Setup OpenShift environment on your client

enpitmac:~ ak$ rhc setup

Starting Interactive Setup for OpenShift's command line interface
...
To connect to openshift.redhat.com enter your OpenShift login (email or Red
Hat login id): <your id>
Password: *******
enpitmac:~ak$ 


Next step: I would like to access the cloud by ssh. So to get this, we need to setup up an SSH equivalence, which actually the red hat client tools are doing for us. For me it was done, when I just send the first command with rhc, i.e.

enpitmac: ak$ rhc app
Password: *******

Starting Interactive Setup for OpenShift's command line interface

It looks like you have not configured or used OpenShift client tools on this computer. We'll help you configure the client tools with a few quick questions.
..
..

The OpenShift client tools have been configured on your computer.  You can run this setup wizard at any time by using the command 'rhc setup' We will now execute your original command (rhc app)
..
enpitmac:~ ak$ 

Well, the command 'rhc app' does not exists, but it helped to setup the ssh equivalence.

Step 4: Install Glassfish
OK, now the fun part starts. After we have setup OpenShift, lets get glassfish running . The easiest way is to log into your open shift cloud through ssh and download the glassfish right into your repository directory.

Goto https://openshift.redhat.com/app/console/applications choose your application and then expand 'WANT TO LOG I TO YOUR APPLICATION' Item. Here you will see the ssh command which allows you to login from your local machine.


Once logged in grab the latest GlassFish binaries into your repository directory:

unzip glassfish-3.1.2.2.zip
...
Since it is not allowed to start more than one http-listener on port 8080 on openshift cloud, we have to adjust the glassfish domain.xml configuration. (Read more about this here: https://openshift.redhat.com/community/blogs/running-java-apps-in-the-cloud-with-glassfish-and-a-paas )

In order to make life easier you can download the preconfigured domain.xml from our server.

In short: it contains the following (main) changes which are needed in order to be able to run Glassfish for ADF Essentials on Openshift.

/domain1/config/domain.xml
a) REPLACE ALL: localhost with OPENSHIFT_INTERNAL_IP
b) deactivate http-listener2 (Openshift only allows to run one listener, no admin console will be available)

CONFIGURE APPROPRIATE JVM SETTINGS FOR ADF ESSENTIALS

c) ADJUST MaxPermSize to:
<
jvm-options>-XX:MaxPermSize=512m</jvm-options> 
d) Configure simple MDS Cache:
<
jvm-options>-Doracle.mds.cache=simple

C.4.3 How to Configure the JVM Cache 
for detailed instructions of the Oracle ADF Admin Guide.)


Start / Stop Glassfish by start / stop hooks of your OpenShift application

Adjust start script hook
adf/.openshift/action_hooks/stop
#!/bin/bash
# The logic to start up your application should be put in this
# script. The application will work only if it binds to
# $OPENSHIFT_INTERNAL_IP:8080
cd $OPENSHIFT_REPO_DIR/diy/glassfish3/glassfish/domains/domain1/config/
mv domain.xml domain.xml_2
sed 's/'$( grep serverName domain.xml_2 | cut -d\" -f 2 )'/'$OPENSHIFT_INTERNAL_IP'/g' domain.xml_2 > domain.xml
../../../bin/asadmin start-domain &> $OPENSHIFT_LOG_DIR/server.log


Adjust stop script  hook
adf/.openshift/action_hooks/stop
kill `ps -ef | grep glassfish3 | grep -v grep | awk '{ print $2 }'` > /dev/null 2>&1
exit 0

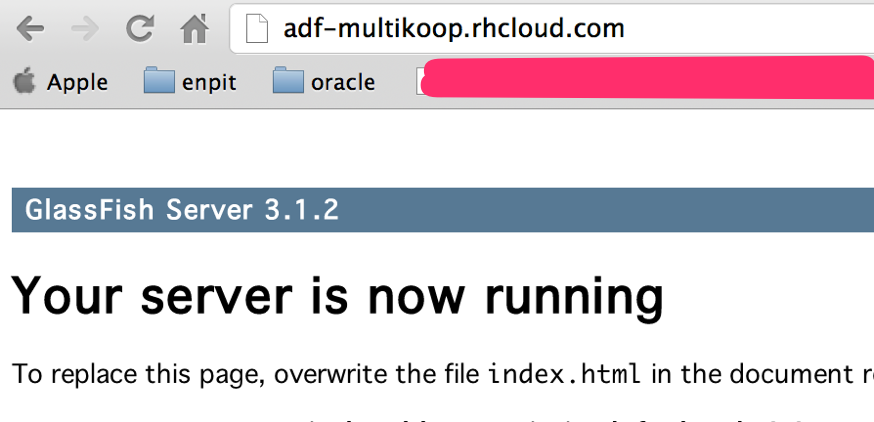
TEST if your Glassfish is running by typing from your client terminal

enpitmac:~ ak$ rhc app start -a adf
...
Result:
SUCCESS

Check on Browser

INSTALL ADF SHARE LIBRARIES FOR GLASSFISH

Well, the basis is done. Now we need to get the ADF Share Libraries onto Glassfish
C.3 Configuring GlassFish with ADF Runtime Libraries 
for detailed instructions of the Oracle ADF Admin Guide.)

Copy adf-essentials.zip onto the $GF_DOMAIN_HOME/lib with scp und unzip (with -j , this is important) 
enpitmac:~ ak$ scp Downloads/adf-essentials.zip @adf-multikoop.rhcloud.com:/var/lib/stickshift//adf/repo/diy/glassfish3/glassfish/domains/domain1/lib
adf-essentials.zip                                                                          100%   21MB  25.6KB/s   13:48   
enpitmac:~ ak$ ssh @adf-multikoop.rhcloud.com
...
[adf-multikoop.rhcloud.com ~]\> cd adf/repo/diy/glassfish3/glassfish/domains/domain1/lib
[adf-multikoop.rhcloud.com lib]\> unzip -j adf-essentials.zip
Archive:  adf-essentials.zip
Label: JDEVADF_11.1.2.3.0_GENERIC_120914.0223.6276.1
  inflating: adf-controller-security.jar 
  inflating: adf-share-security.jar 
...
[adf-multikoop.rhcloud.com lib]\>

Now restart glassfish to grab the changes!
adf-multikoop.rhcloud.com ~]\> ./adf/repo/.openshift/action_hooks/stop
..
adf-multikoop.rhcloud.com ~]\> ./adf/repo/.openshift/action_hooks/start
..

Create a simple ADF 11.1.2.3 Application and copy it into the autodeploy folder
enpitmac:~ ak$ cd Workspace/enpit-base/development/enpit.sample/enpit.sample.gf.app1/deploy/

enpitmac:deploy ak$ scp enpit-sample-app1.ear <.....>@adf-multikoop.rhcloud.com:/var/lib/stickshift/<...>/adf/repo/diy/glassfish3/glassfish/domains/domain1/autodeploy
enpit-sample-app1.ear                                                                       100%   64MB  18.1KB/s   59:55   
enpitmac:deploy ak$ 

(BTW: I must say the size of the EAR for ONE single ADF UI View just sucks: more than 60MB.  IMHO not ready for the cloud!)

Anyway, after doing all that above the running application should be satisfying ;)

WHAT'S NEXT

  • Hopefully Oracle will unveil the Oracle Cloud for everyone who wants to run / try out ADF ;). Please ! http://cloud.oracle.com

REFERENCES


Wednesday, August 29, 2012

Slides from DOAG SIG FMW 'WebLogic Administration and Deployment with WLST' (ger)

Today I had the pleasure to present about Oracle WebLogic Scripting Tool at the DOAG SIG Middleware, Cologne, Germany. First time for http://www.enpit-consulting.com. Slides are in german, but WLST scripts are still Jython, so also worth for the english Oracle Fusion Middleware Community ;)